By default, WordPress stores media files uploaded via the Media Library on the same server as your WordPress installation. While this works for many sites, it can cause performance issues, especially for those with high traffic or a large volume of media.
Media offloading solves this by moving media files to an external cloud storage. One such solution is Cloudflare R2, a high-performance, cost-effective storage service that seamlessly integrates with WordPress to store and manage large volumes of media files, improving your site’s performance and scalability.
Step 1: Understanding Cloudflare R2
Cloudflare R2 is a next-generation object storage solution designed to eliminate the high data transfer fees typically charged by other cloud providers. It offers scalable and highly available storage without costly egress fees, and with full S3 API compatibility, it seamlessly integrates with existing tools and applications built around Amazon S3.
For WordPress users, Cloudflare R2 provides an effective way to offload media files, reducing server load while maintaining quick access through Cloudflare’s distributed infrastructure. This makes it especially useful for high-traffic websites with large media libraries.
Step 2: Cloudflare Account
To start using Cloudflare R2, first log in to your Cloudflare account, or create one if you don’t have it:
- Go to the Cloudflare Sign Up page.
- Enter your email and password.
- Click Create Account.
- Verify your email via the link sent to your inbox.
Once your account is verified, you’re ready to start setting up R2 storage.
Step 3: Activating Cloudflare R2
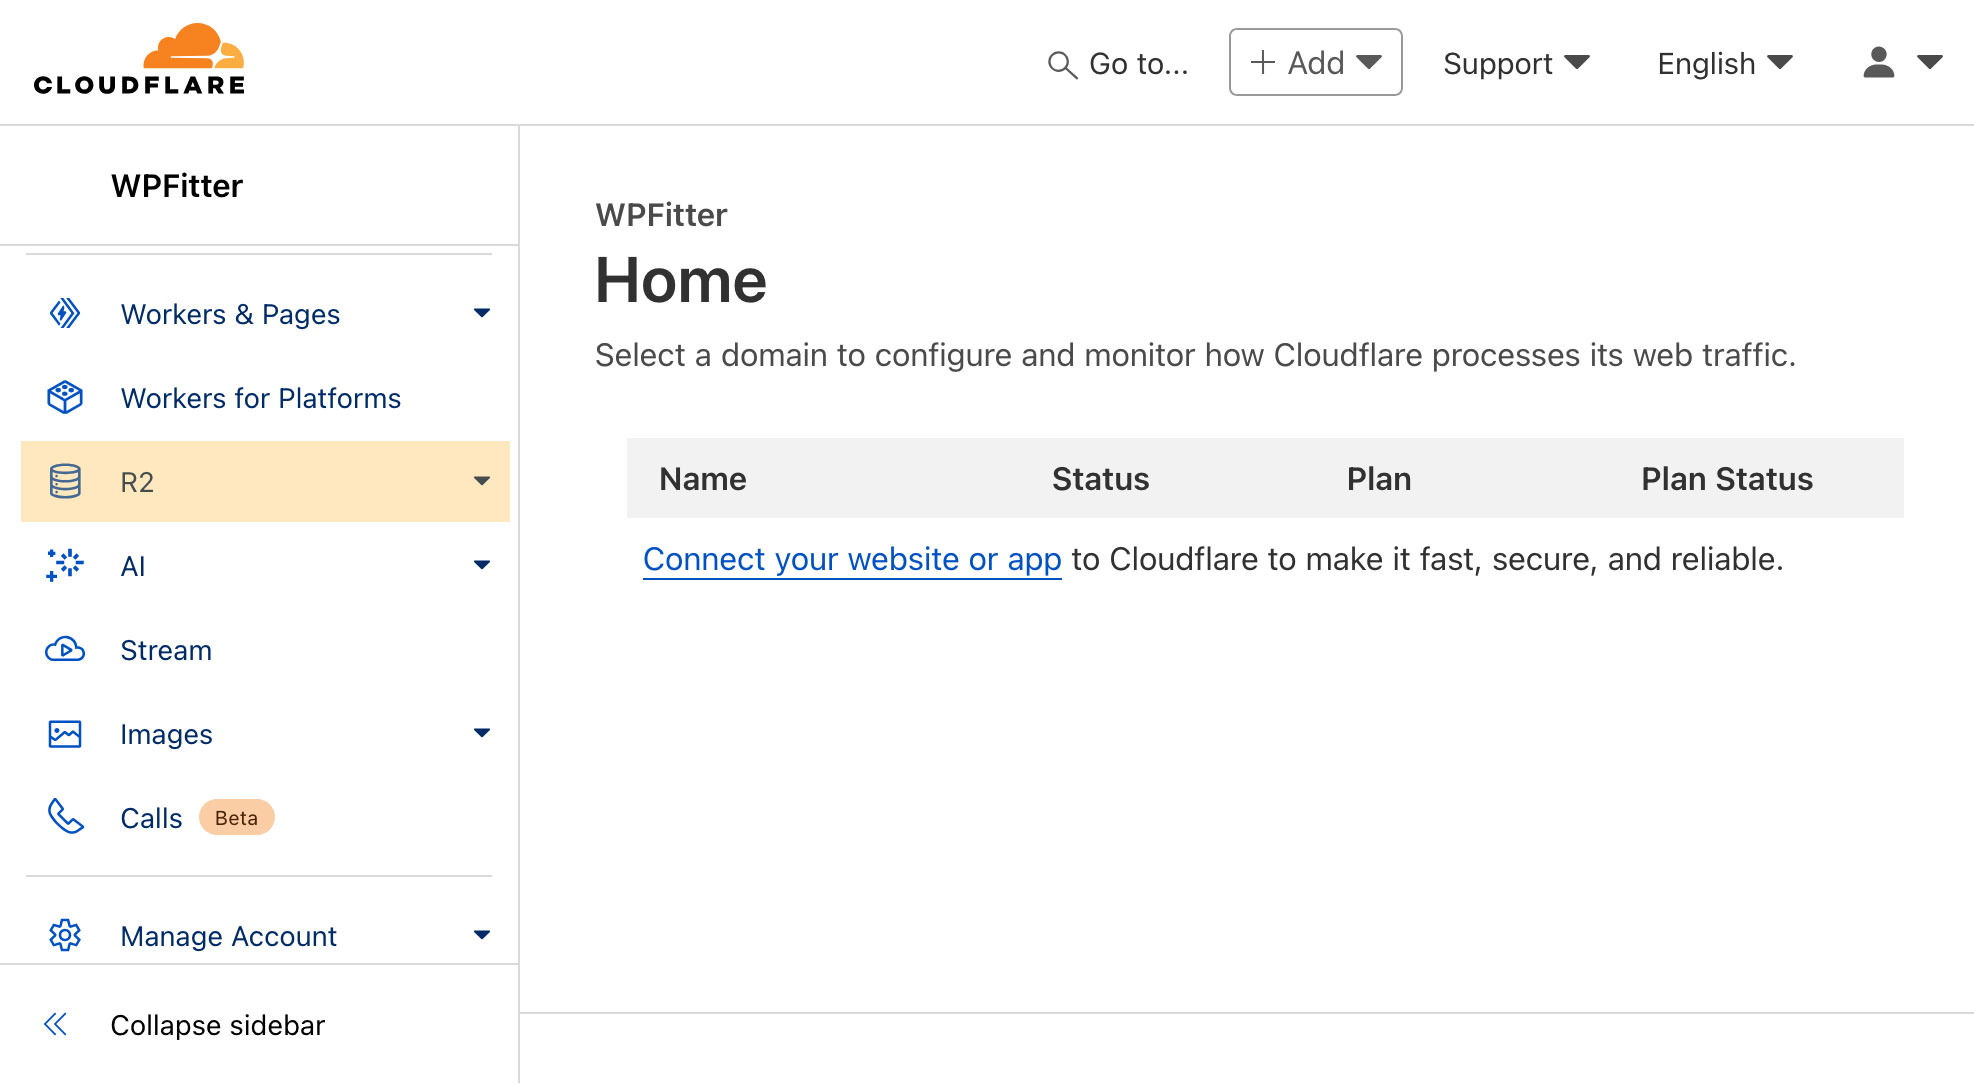
After logging into your Cloudflare account, find R2 in the left-hand sidebar of the dashboard. Click on it to begin the setup process.
If this is your first time using R2, you’ll need to add a payment method, such as a credit card or PayPal. It’s worth noting that Cloudflare R2 offers 10GB of free storage, giving you room to explore and test without immediate costs.
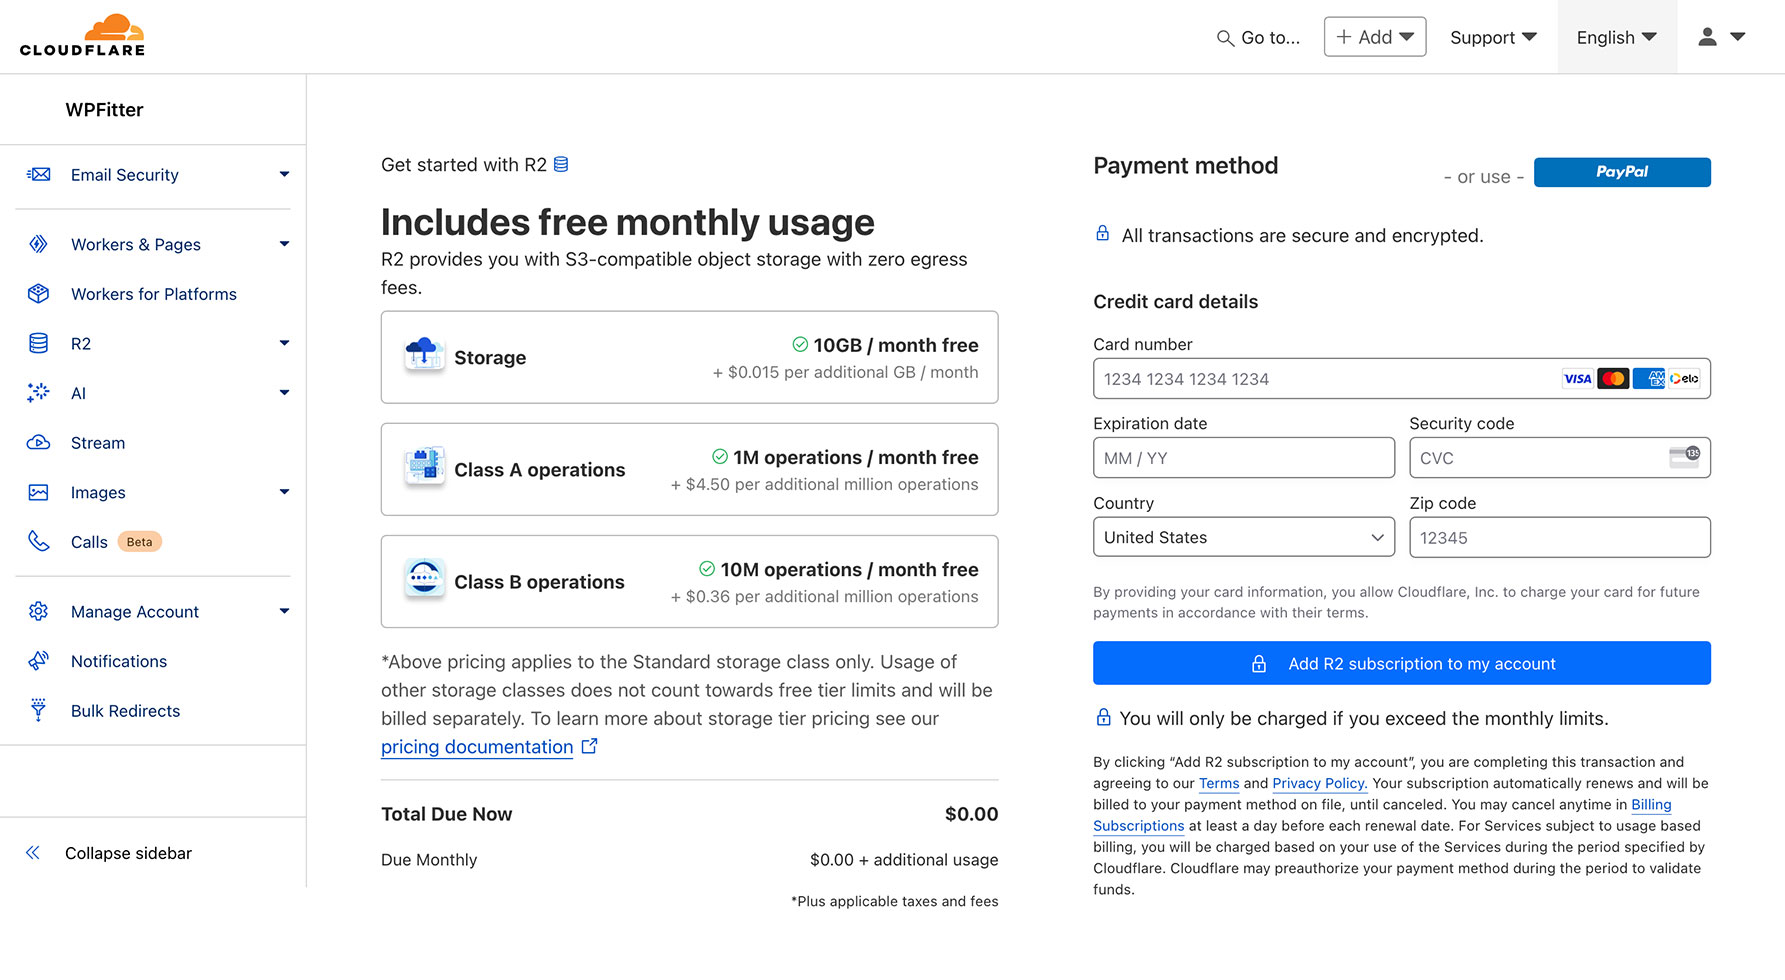
Once your payment method is added, you can proceed to create your R2 bucket.
Step 4: Create a Bucket
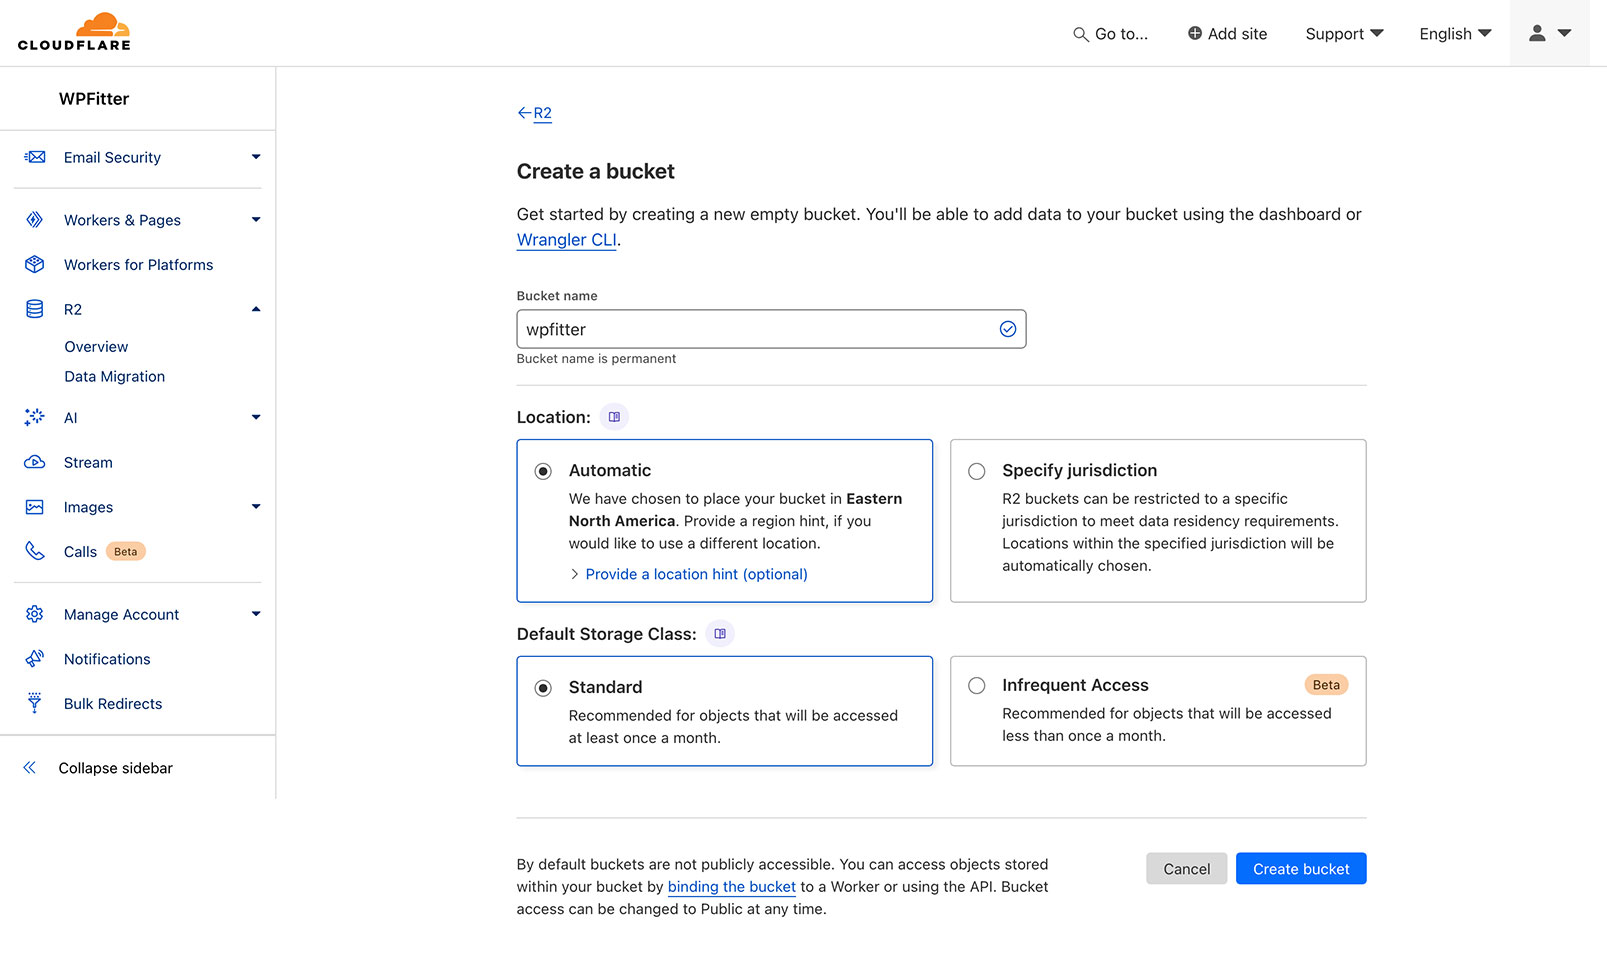
On the R2 page in your Cloudflare account, click the Create Bucket button. Then, follow these steps:
- Bucket Name: Enter a unique name for your bucket.
- Location: Select Automatic to allow Cloudflare to optimize based on your needs.
- Default Storage Class: Choose Standard for the best balance of cost and performance.
After completing these fields, click Create Bucket to finalize the setup.
Step 5: Connect a Custom Domain to your Bucket
You can connect a custom sub-domain (likemedia.yourdomain.com) to your R2 bucket.
First, make sure your domain is connected to Cloudflare. Then, follow the next steps to link your sub-domain to Cloudflare R2.
If you’re not familiar with these settings, be careful — and don’t hesitate to contact us so our engineers can help you set it up safely.
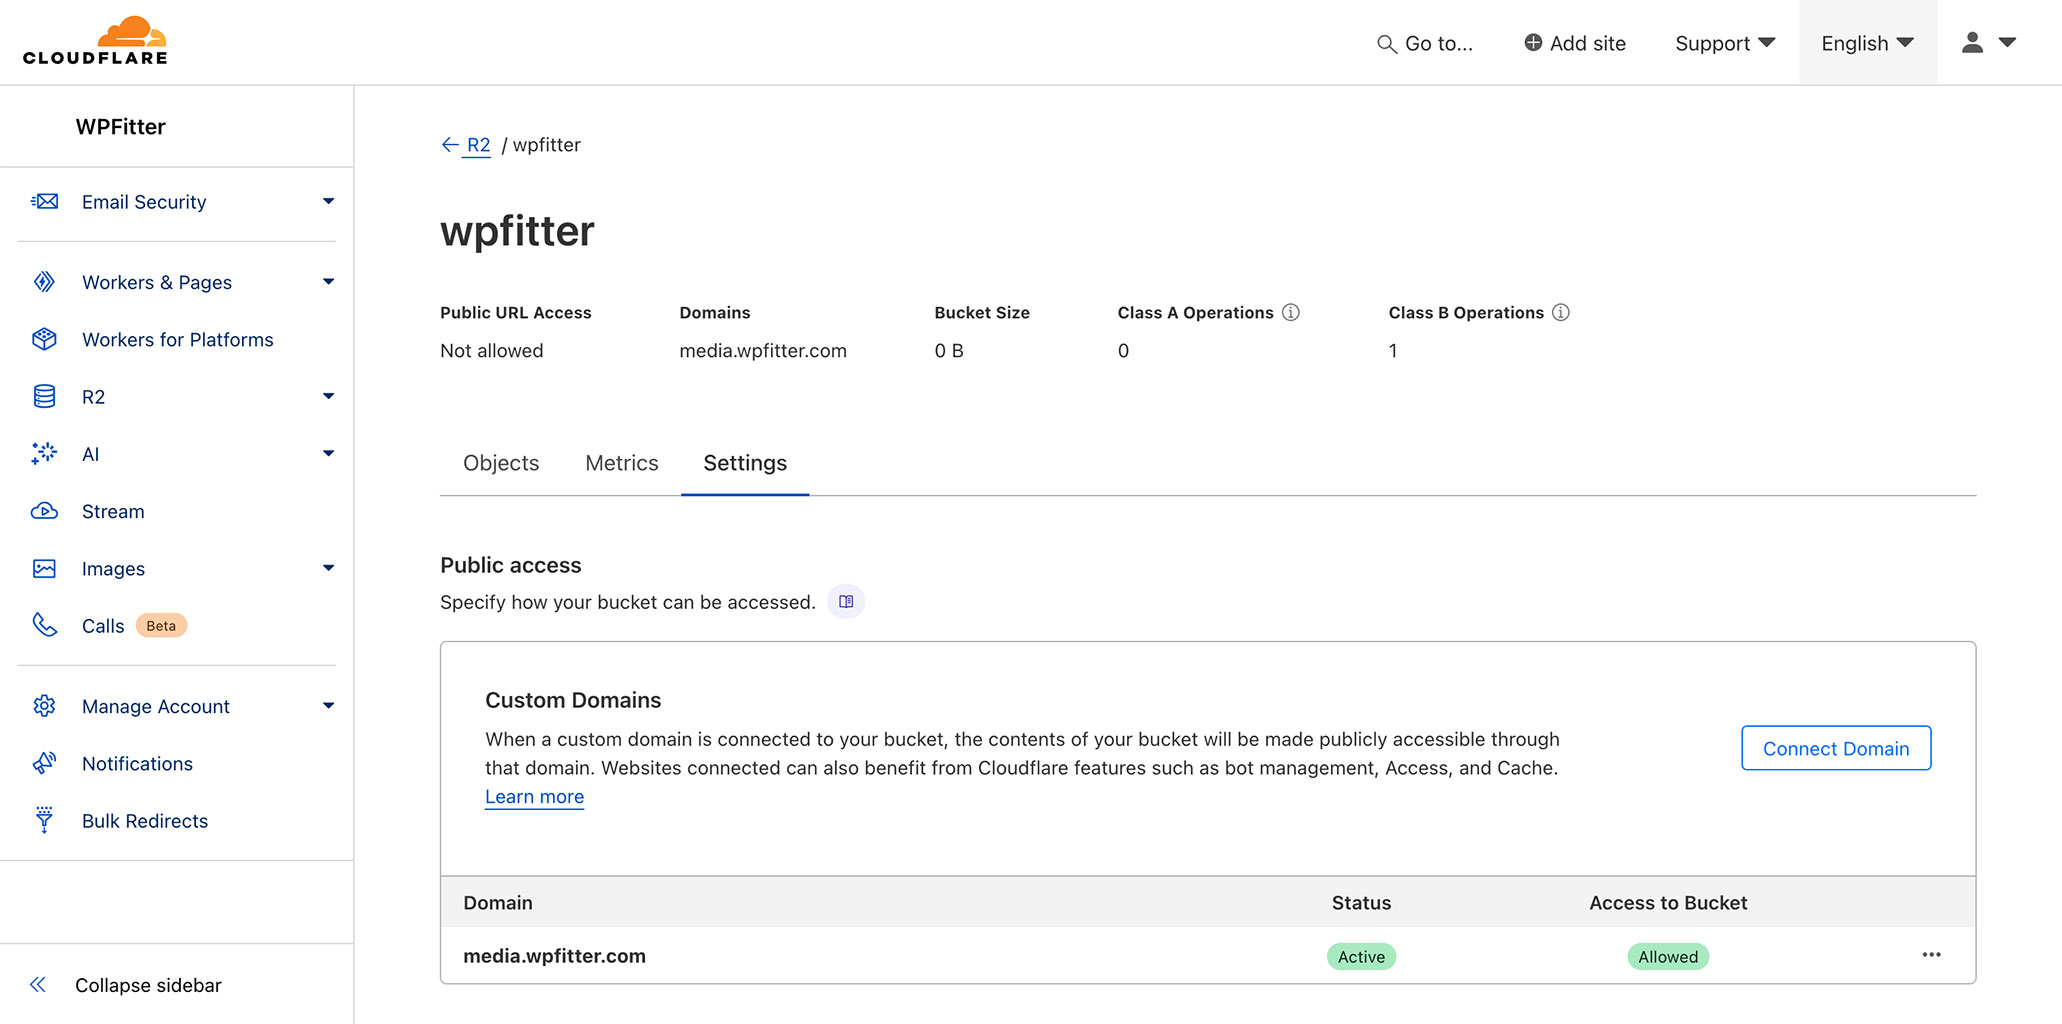
After creating your bucket, you’ll be automatically redirected to its page. Follow these steps to connect a custom domain:
- Click on Settings.
- Under Public access > Custom Domains, select Connect Domain.
- Enter the domain name and click Continue.
- Review the DNS record and click Connect Domain.
Your domain will take a few minutes to become active.
Restrictions for Custom Domains with Cloudflare R2
When connecting a custom domain to your Cloudflare R2 bucket, keep the following restrictions in mind:
- The domain you use must be linked to the same Cloudflare account as the R2 bucket.
- Domains with CNAME flattening enabled won’t work. Disable it before connecting your domain to R2.
- Access to objects in the bucket is only allowed via HTTPS; plain HTTP is not supported.
Step 6: Connecting Cloudflare R2 to WordPress
To seamlessly offload your media files to Cloudflare R2, the Advanced Media Offloader plugin offers an easy-to-use solution. This plugin allows you to connect your WordPress media library directly to R2, significantly improving performance by reducing server load.
For more details, visit the plugin’s official page or check it out on the WordPress Plugin Directory.
Installing and Activating the Advanced Media Offloader Plugin
In your WordPress dashboard, go to Plugins > Add New Plugin. Search for Advanced Media Offloader, click Install Now, and activate the plugin once installed.
Alternatively, you can download the plugin from the WordPress Plugin Directory, then upload and install it manually via Plugins > Add New Plugin > Upload Plugin.
After activation, you’ll be ready to configure the plugin for Cloudflare R2.
Configuring the Advanced Media Offloader Plugin
Once the Advanced Media Offloader plugin is activated, follow these steps to configure it:
- Go to Media Offloader in your WordPress dashboard sidebar.
- To configure the plugin, add your Cloudflare R2 credentials to your
wp-config.phpfile using the provided constants. - Choose whether to delete local files after offloading to Cloudflare R2.
- Save your settings to complete the configuration.
Here’s an example of the constants that should be added to your wp-config.php file. Make sure to replace the placeholders with your actual Cloudflare R2 credentials:
define('ADVMO_CLOUDFLARE_R2_KEY', 'your-access-key');
define('ADVMO_CLOUDFLARE_R2_SECRET', 'your-secret-key');
define('ADVMO_CLOUDFLARE_R2_BUCKET', 'your-bucket-name');
define('ADVMO_CLOUDFLARE_R2_DOMAIN', 'your-domain-url');
define('ADVMO_CLOUDFLARE_R2_ENDPOINT', 'your-endpoint-url');
For full instructions on generating your Access Key, Secret Key, and other details, refer to the Cloudflare R2 API Tokens Documentation.
Test the connection
After adding the credentials to wp-config.php, go to Media Offloader in the WordPress dashboard and select Cloudflare R2 as the Cloud Provider and save the settings.
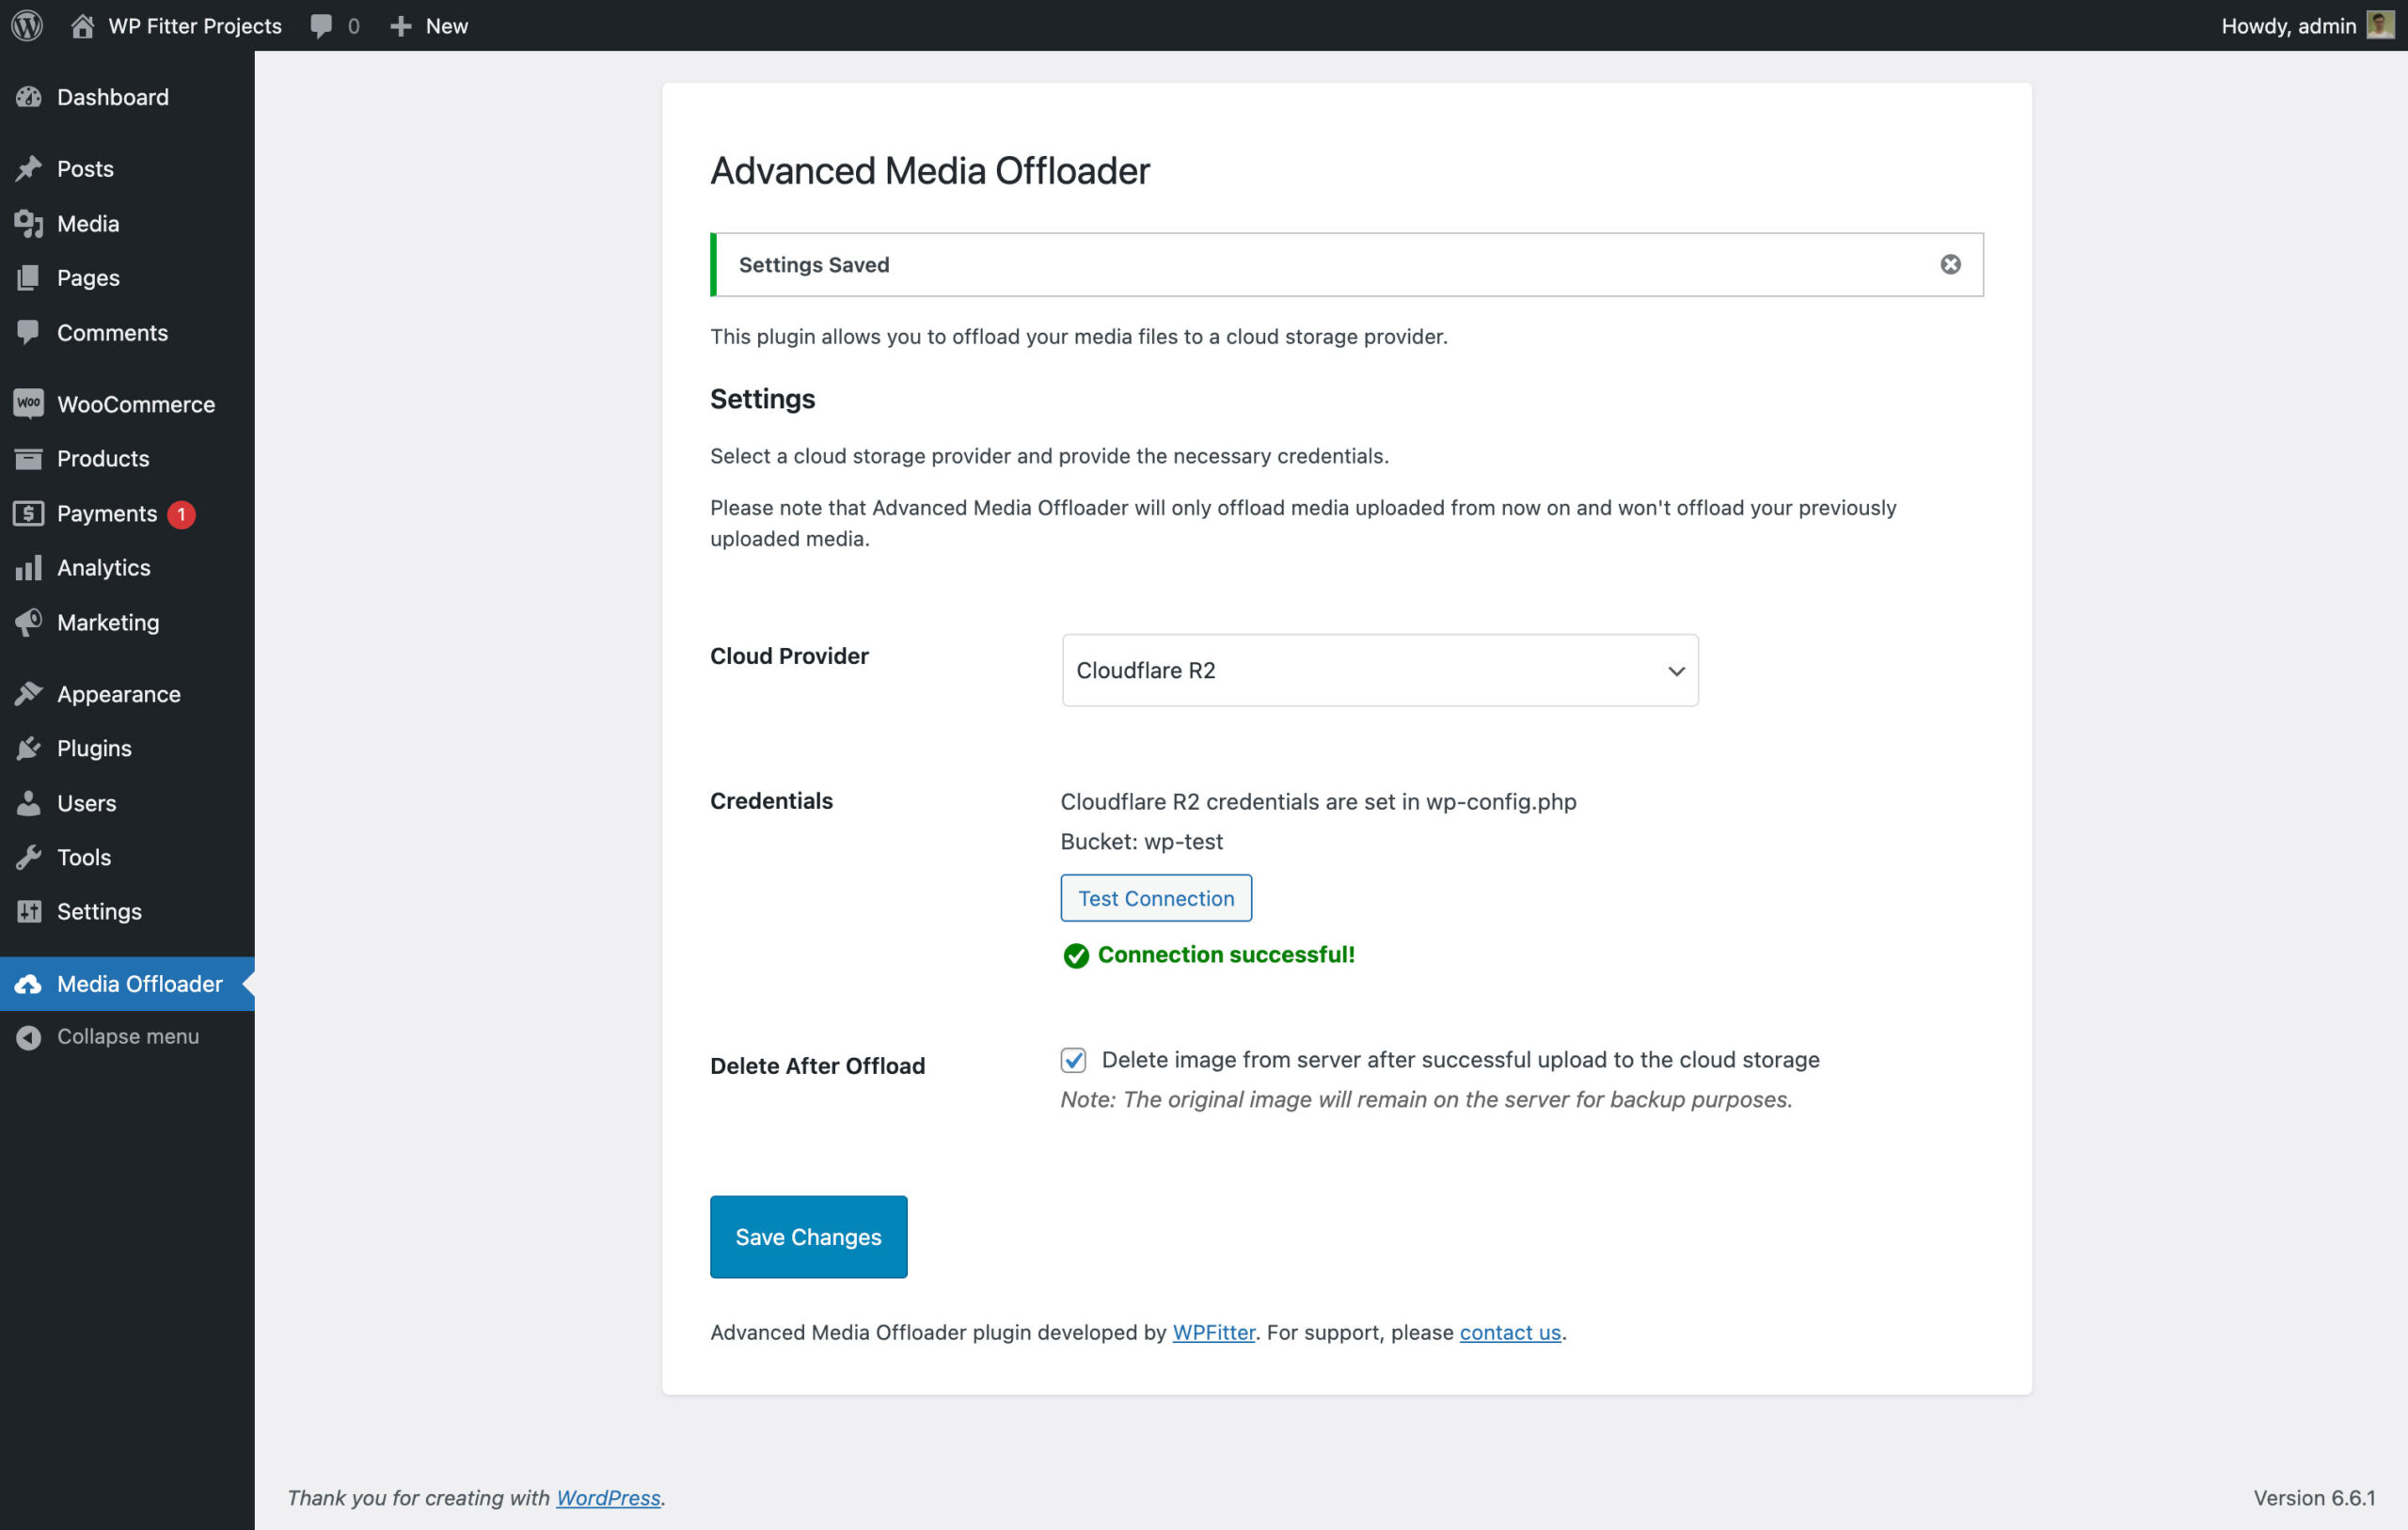
To ensure the connection is working, click Test Connection. If you receive a successful connection message, your media library is now properly connected to Cloudflare R2, and media files will be offloaded seamlessly.
If you encounter any issues configuring the plugin, feel free to reach out in the comments section below or contact us directly through the Get in Touch page.
Step 7: Offloading Your Existing Media Library
Following these steps will offload all new media you upload. But what about all the images and files already in your media library?
While the plugin’s bulk offload feature in the WordPress admin is great for smaller sites, it can be slow or time out if you have a large library with thousands of files.
For a much faster and more reliable method, you can use WP-CLI to bulk offload your entire existing library. We’ve covered this advanced technique in a separate guide.
→ Read more: How to Bulk Offload Your Media Library using WP-CLI
Conclusion
Offloading your WordPress media to Cloudflare R2 can significantly improve your site’s performance by reducing server load and improving scalability. With the help of the Advanced Media Offloader plugin, the process is simple, from creating your R2 bucket to configuring the plugin and testing the connection.
With this setup, your WordPress website is ready to handle larger media libraries efficiently.
