In this article, we’ll guide you through creating an Amazon S3 bucket, configuring its settings, connecting a custom subdomain, enabling SSL, and integrating it with WordPress using the Advanced Media Offloader plugin.
This tutorial assumes your domain is already set up and managed through Cloudflare. If you haven’t connected your website to Cloudflare yet, you can follow this tutorial to get started.
Why Use Amazon S3 with Cloudflare CDN?
Amazon S3 is a scalable, reliable, and cost-effective cloud storage service for storing and retrieving any amount of data from anywhere on the web. It offers high availability and robust security features. However, accessing files directly from S3 can be slow. To boost performance, we’ll use Cloudflare as an intermediary to cache and accelerate content delivery with its CDN.
Step 1: Setting Up Your Amazon S3 Bucket
Before you can start offloading your WordPress media files, you need to set up an Amazon S3 bucket. This process involves two key steps: creating the bucket and configuring it properly. The bucket name and configuration are crucial for seamless integration with your WordPress site and the Advanced Media Offloader plugin. In the following subsections, we’ll walk you through creating a bucket with the correct naming convention and adjusting its settings for optimal performance and security.
Set up and log into your AWS account
To use Amazon S3, you need an AWS account. If you don’t have one, visit this page and click “Create a Free Account”. Follow the prompts to set up your account. Once created, log in to the AWS Management Console. Remember, you won’t be charged for Amazon S3 until you start using it.
Create a New Bucket
1. Sign in to the AWS Management Console and open the Amazon S3 console at https://console.aws.amazon.com/s3/.
2. In the navigation bar on the top of the page, choose the name of the currently displayed AWS Region. Next, choose the Region in which you want to create a bucket.
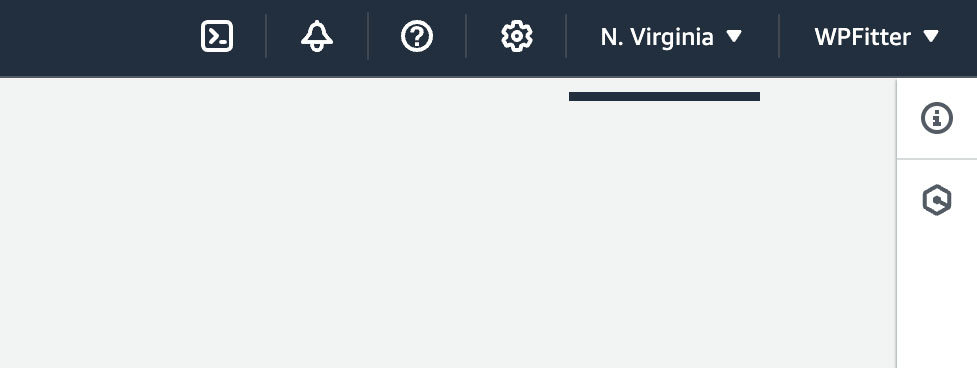
To minimize latency and costs and address regulatory requirements, choose a Region close to you. Objects stored in a Region never leave that Region unless you explicitly transfer them to another Region.
3. In the left navigation pane, choose Buckets.
4. Choose Create bucket, The Create bucket page opens.
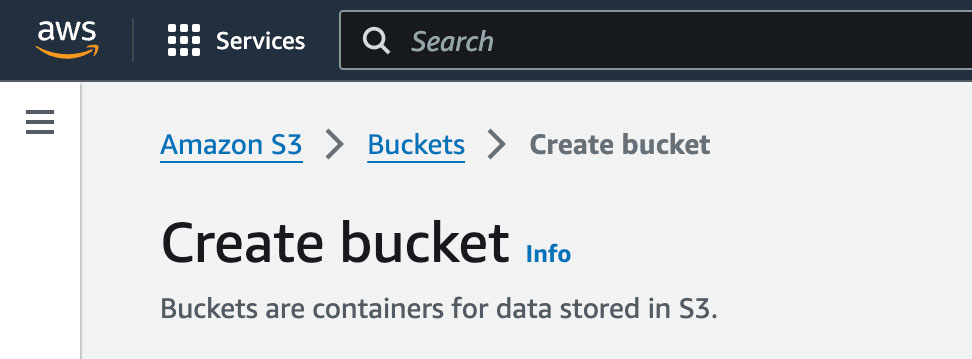
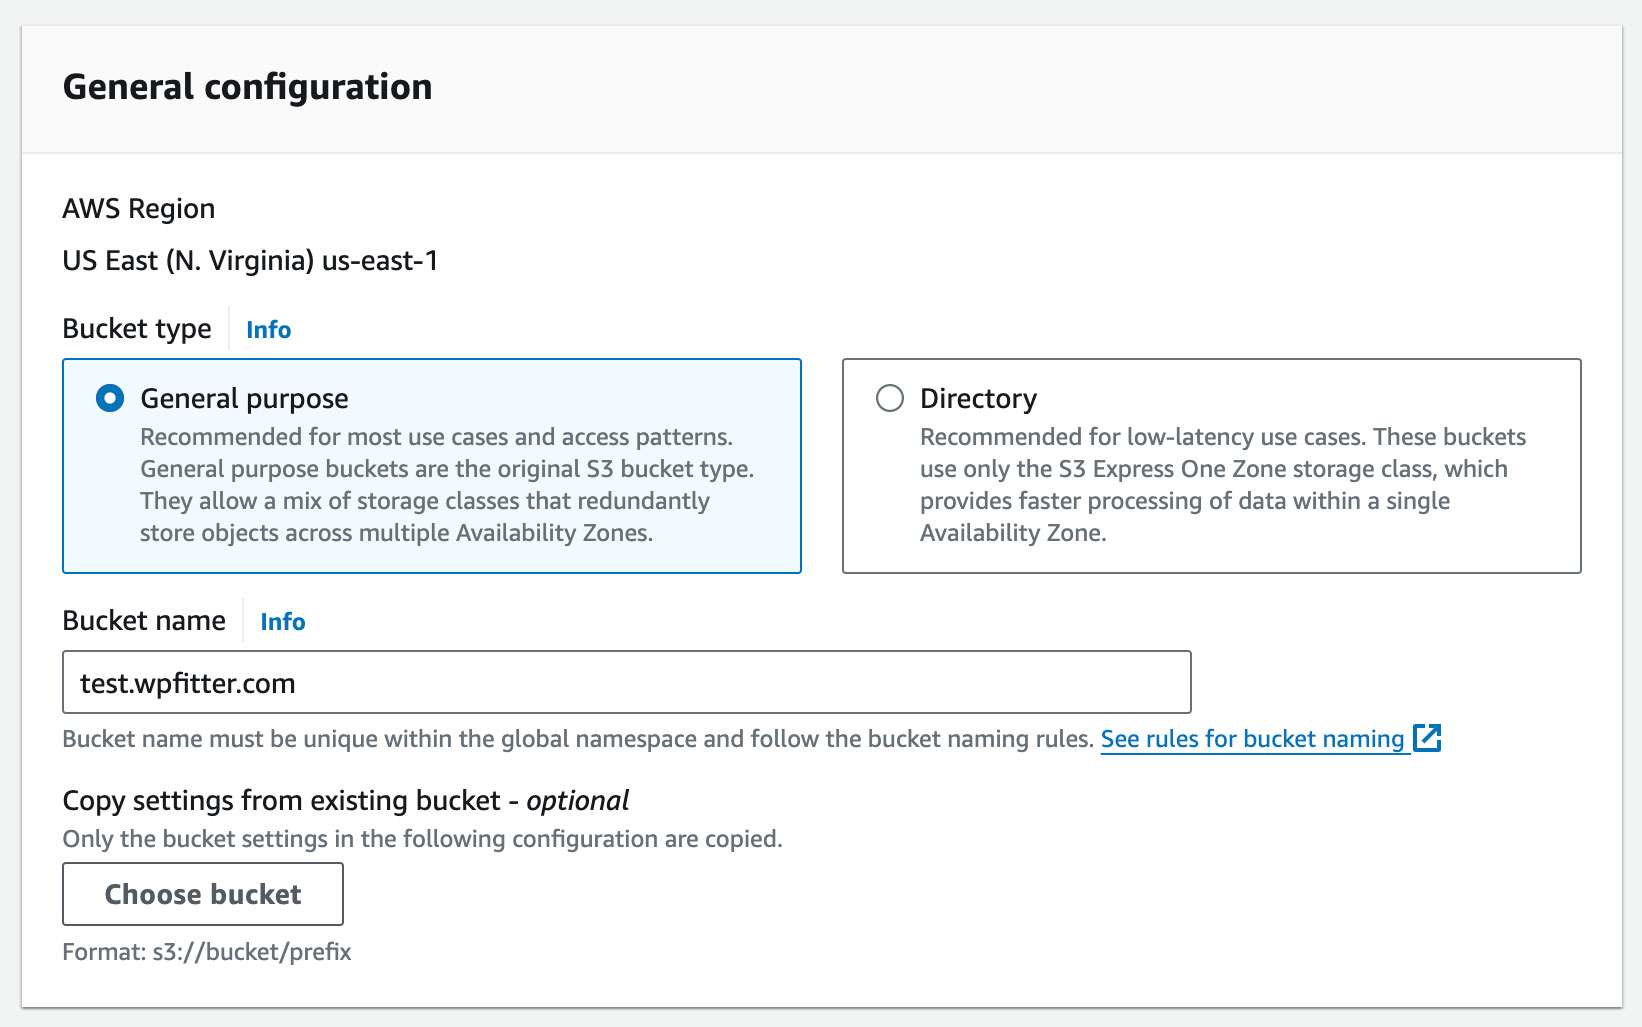
5. Under General configuration, view the AWS Region where your bucket will be created. Under Bucket type, choose General purpose. For Bucket name, enter a name for your bucket. The bucket name MUST be the same as your custom sub-domain. For example if your domain is media.example.com, your bucket name should be also media.example.com.
6. In the General configuration section, review the AWS Region where your bucket will be created. Under Bucket type, select “General purpose“. For the Bucket name, enter a name that MUST match your custom subdomain exactly. For instance, if your planned subdomain is media.example.com, your bucket name should also be media.example.com. This matching is crucial for proper integration with Cloudflare.
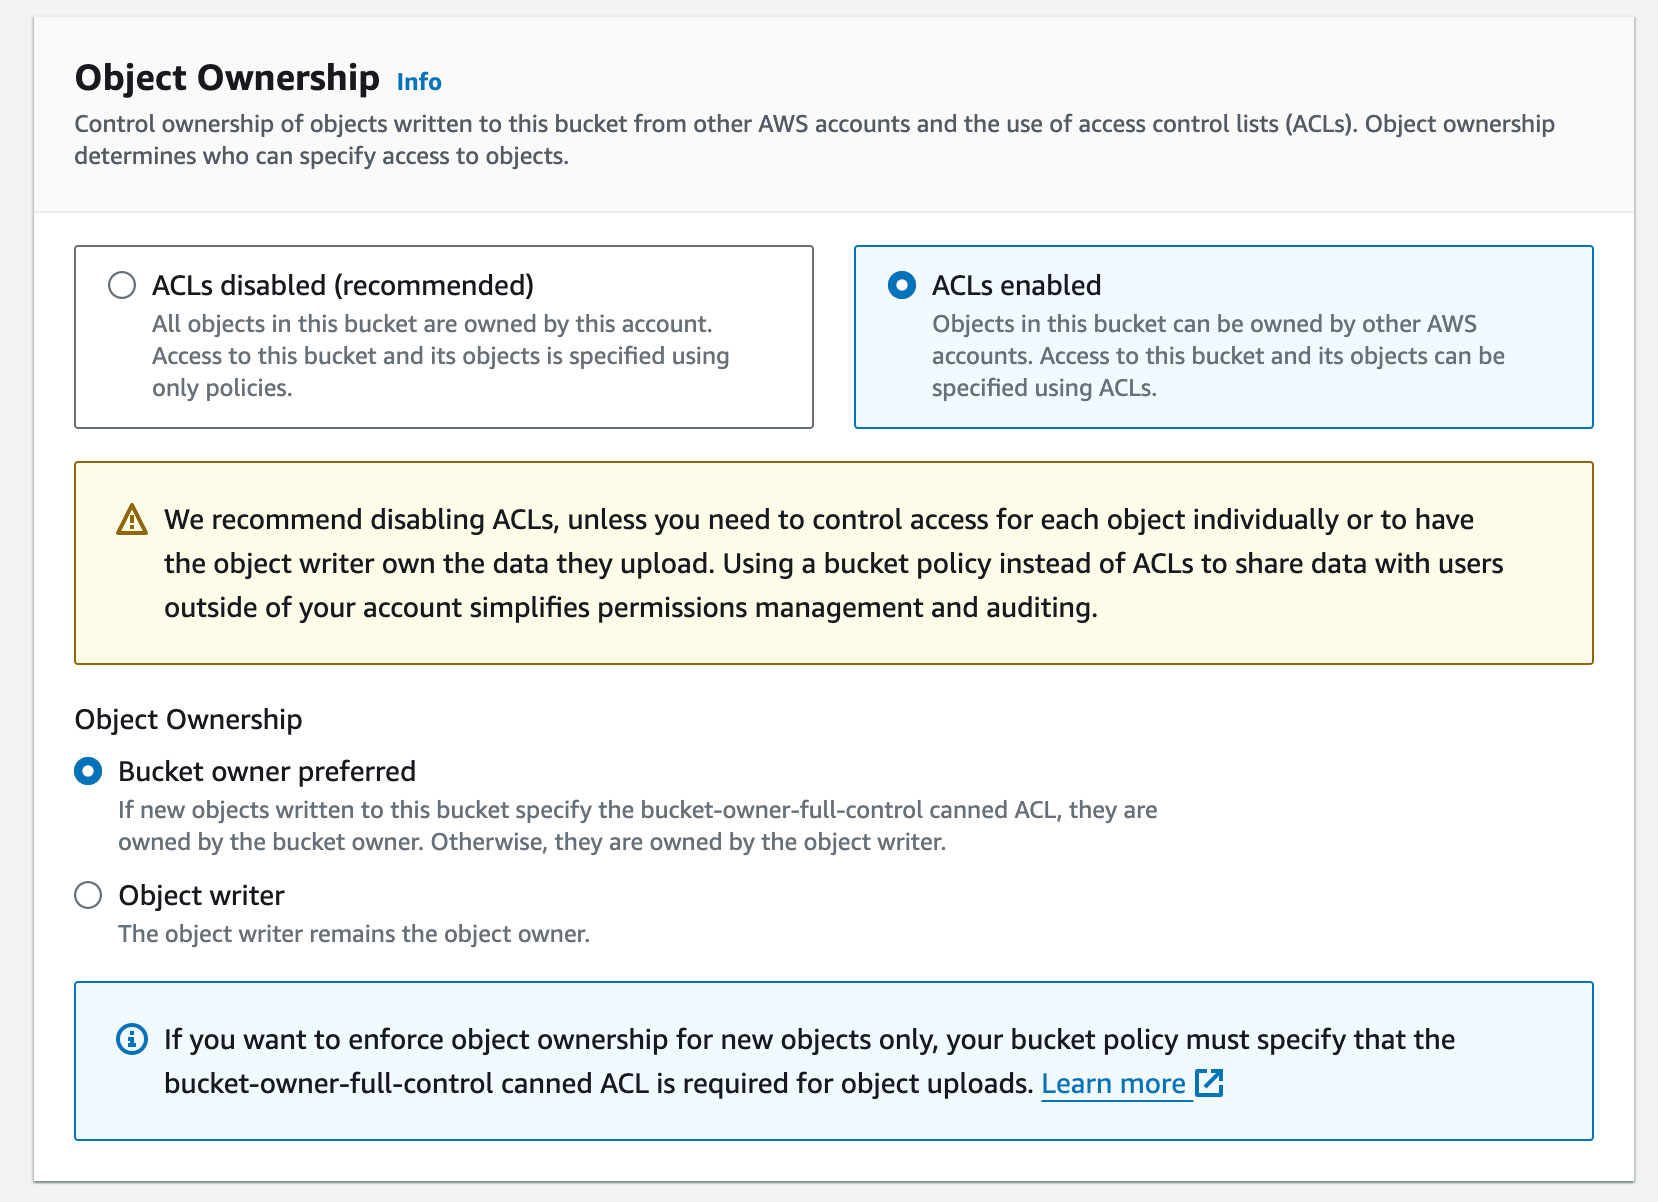
7. Under Object Ownership, Enable ACLs and select “Bucket owner preferred” to ensure proper control over object permissions.
8. Under Block Public Access settings for this bucket, Uncheck “Block all public access” to allow public read access to your media files.
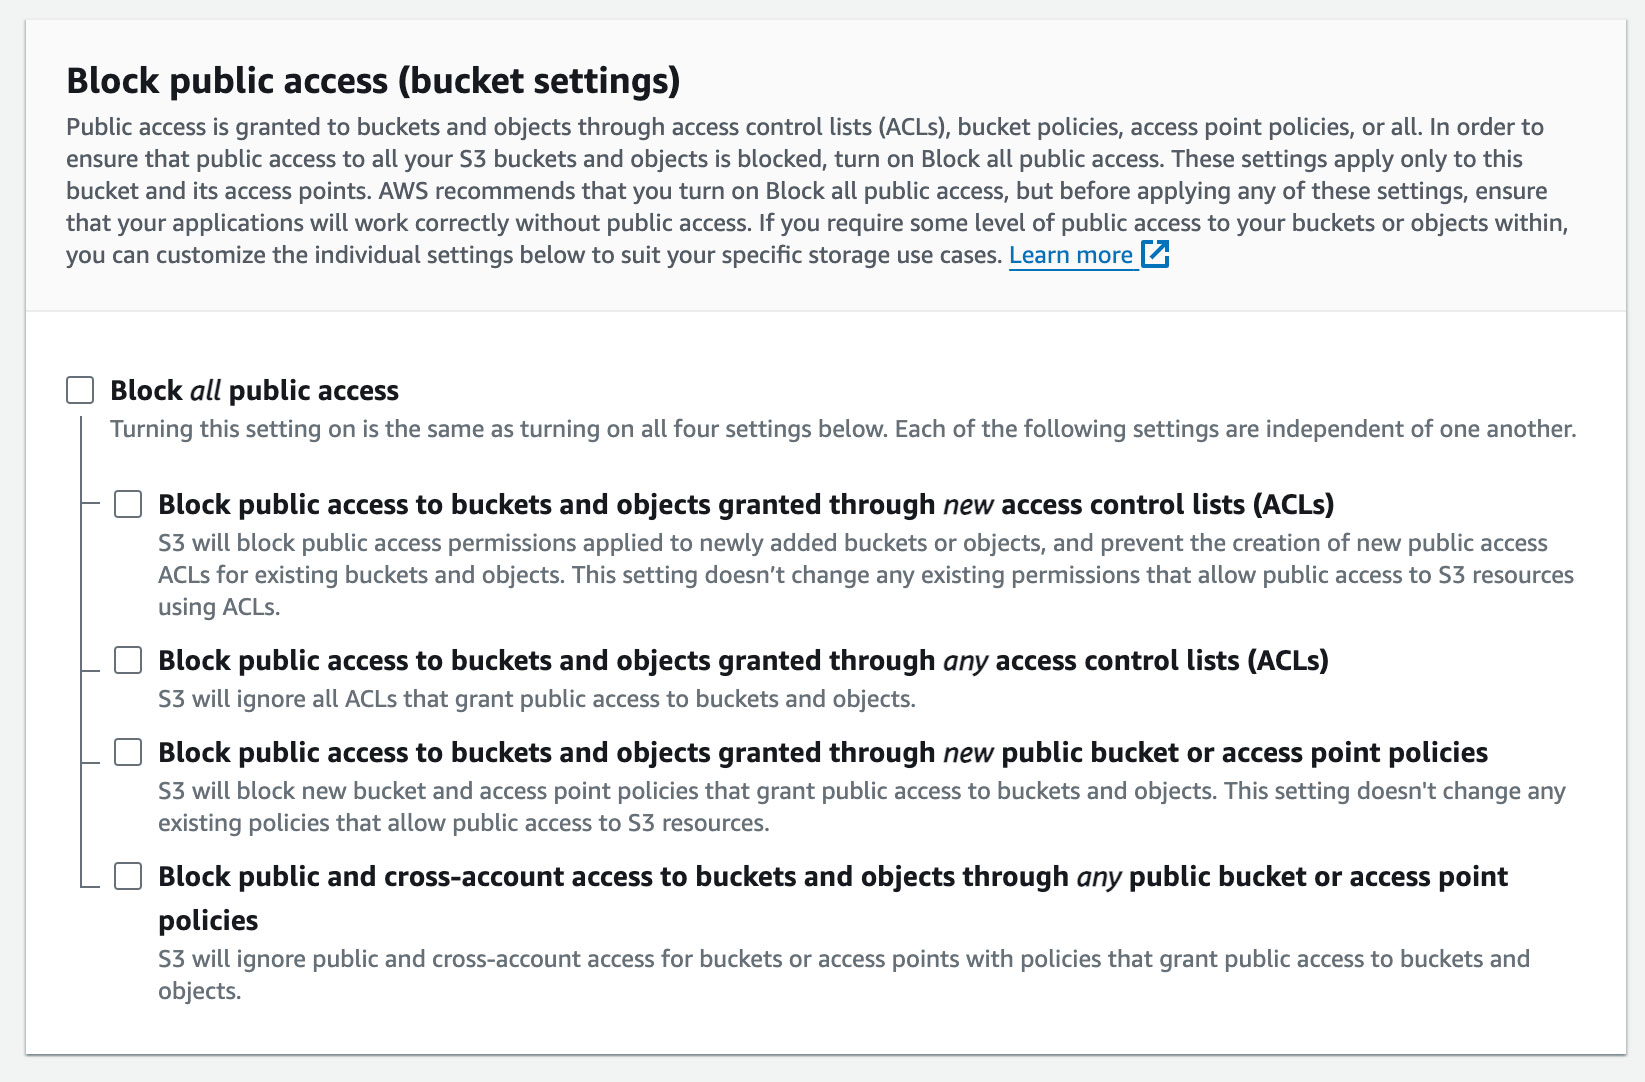
By default, all four Block Public Access settings are enabled. We recommend that you keep all settings enabled, unless you know that you need to turn off one or more of them for your specific use case.
9. Under Object Versioning, Keep this option disabled to avoid storing multiple versions of each object.
10. Leave all other settings at their default values. Click “Create bucket” to finalize your S3 bucket setup.
Enable Static Website Hosting
- In the Buckets list, choose the name of the bucket that you want to enable static website hosting for.
- Choose Properties.
- Under Static website hosting, choose Edit.
- Under Static website hosting, choose Enable.
- Under Hosting type, choose Host a static website
- In Index document, enter the file name of the index document, typically
index.html. - Choose Save changes
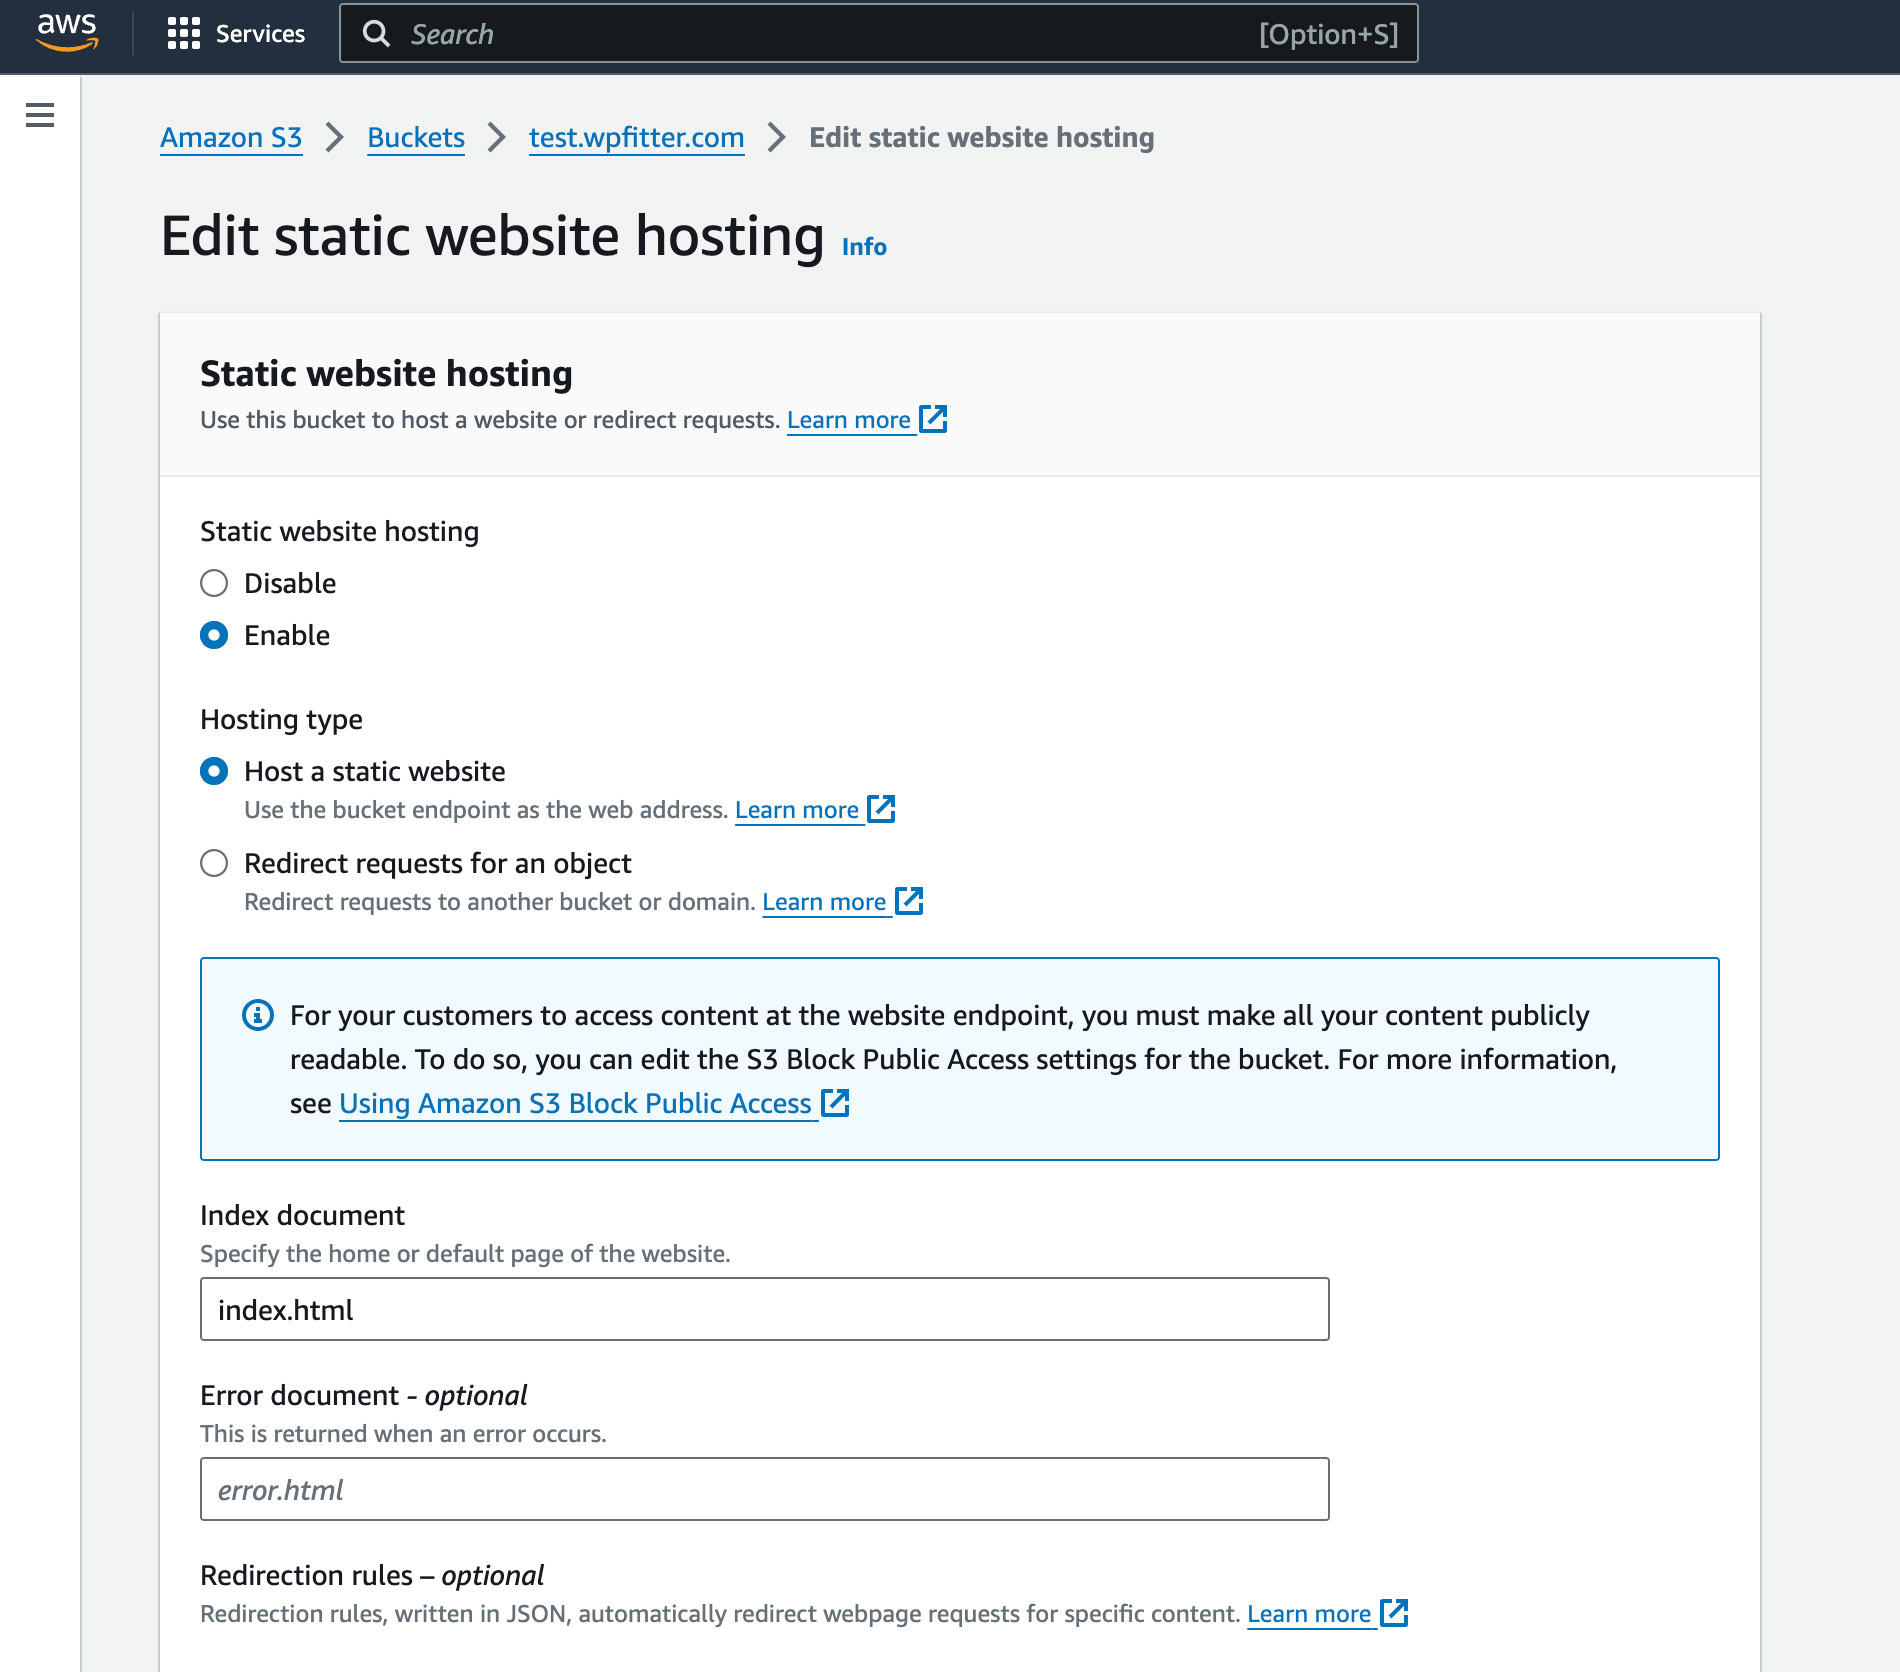
After saving changes, locate the Endpoint in the Static website hosting section under Properties. This Amazon S3 website endpoint is crucial for setting up the subdomain later in the next steps in Cloudflare.

Configure bucket policies to allow Cloudflare IP addresses
Follow these instructions from Amazon to Add an S3 Bucket Policy ↗.
And in the Bucket policy editor, paste the following snippet:
{
	"Version": "2012-10-17",
	"Statement": [
		{
			"Sid": "PublicReadGetObject",
			"Effect": "Allow",
			"Principal": "*",
			"Action": "s3:GetObject",
			"Resource": "arn:aws:s3:::test.wpfitter.com/*",
			"Condition": {
				"IpAddress": {
					"aws:SourceIp": [
						"173.245.48.0/20",
						"103.21.244.0/22",
						"103.22.200.0/22",
						"103.31.4.0/22",
						"141.101.64.0/18",
						"108.162.192.0/18",
						"190.93.240.0/20",
						"188.114.96.0/20",
						"197.234.240.0/22",
						"198.41.128.0/17",
						"162.158.0.0/15",
						"104.16.0.0/12",
						"172.64.0.0/13",
						"131.0.72.0/22",
						"2400:cb00::/32",
						"2606:4700::/32",
						"2803:f800::/32",
						"2405:b500::/32",
						"2405:8100::/32",
						"2a06:98c0::/29",
						"2c0f:f248::/32"
					]
				}
			}
		}
	]
}
Replace test.wpfitter.com with your actual subdomain and save changes. This policy limits file access only through your Cloudflare subdomain. Learn more about this approach here.
Step 2: Connecting a Custom Subdomain to Your S3 Bucket
Log into Cloudflare, select your domain, then choose DNS from the left sidebar.
Click Add Record to create the subdomain DNS record:
- Type: CNAME
- Name: Enter subdomain (e.g., test for test.wpfitter.com)
- Value: Paste the bucket website endpoint (without https://)
For detailed instructions, see Managing DNS records in Cloudflare ↗.
Enable SSL for Your Custom Domain
Since S3 static sites do not support HTTPS by default, use a Configuration Rule to set the SSL Mode to Flexible.
Step 3: Create Amazon S3 Access key and Secret Key
In order to obtain the Access Key and Secret Key which is needed to connect your bucket to WordPress, the easiest and safest approach is to create a new IAM user in AWS with permissions limited to S3 buckets, accessible only through the API.
1. Navigate to the IAM Users page in the AWS Console and click Add users.
2. In the User name field, enter a name for the user.
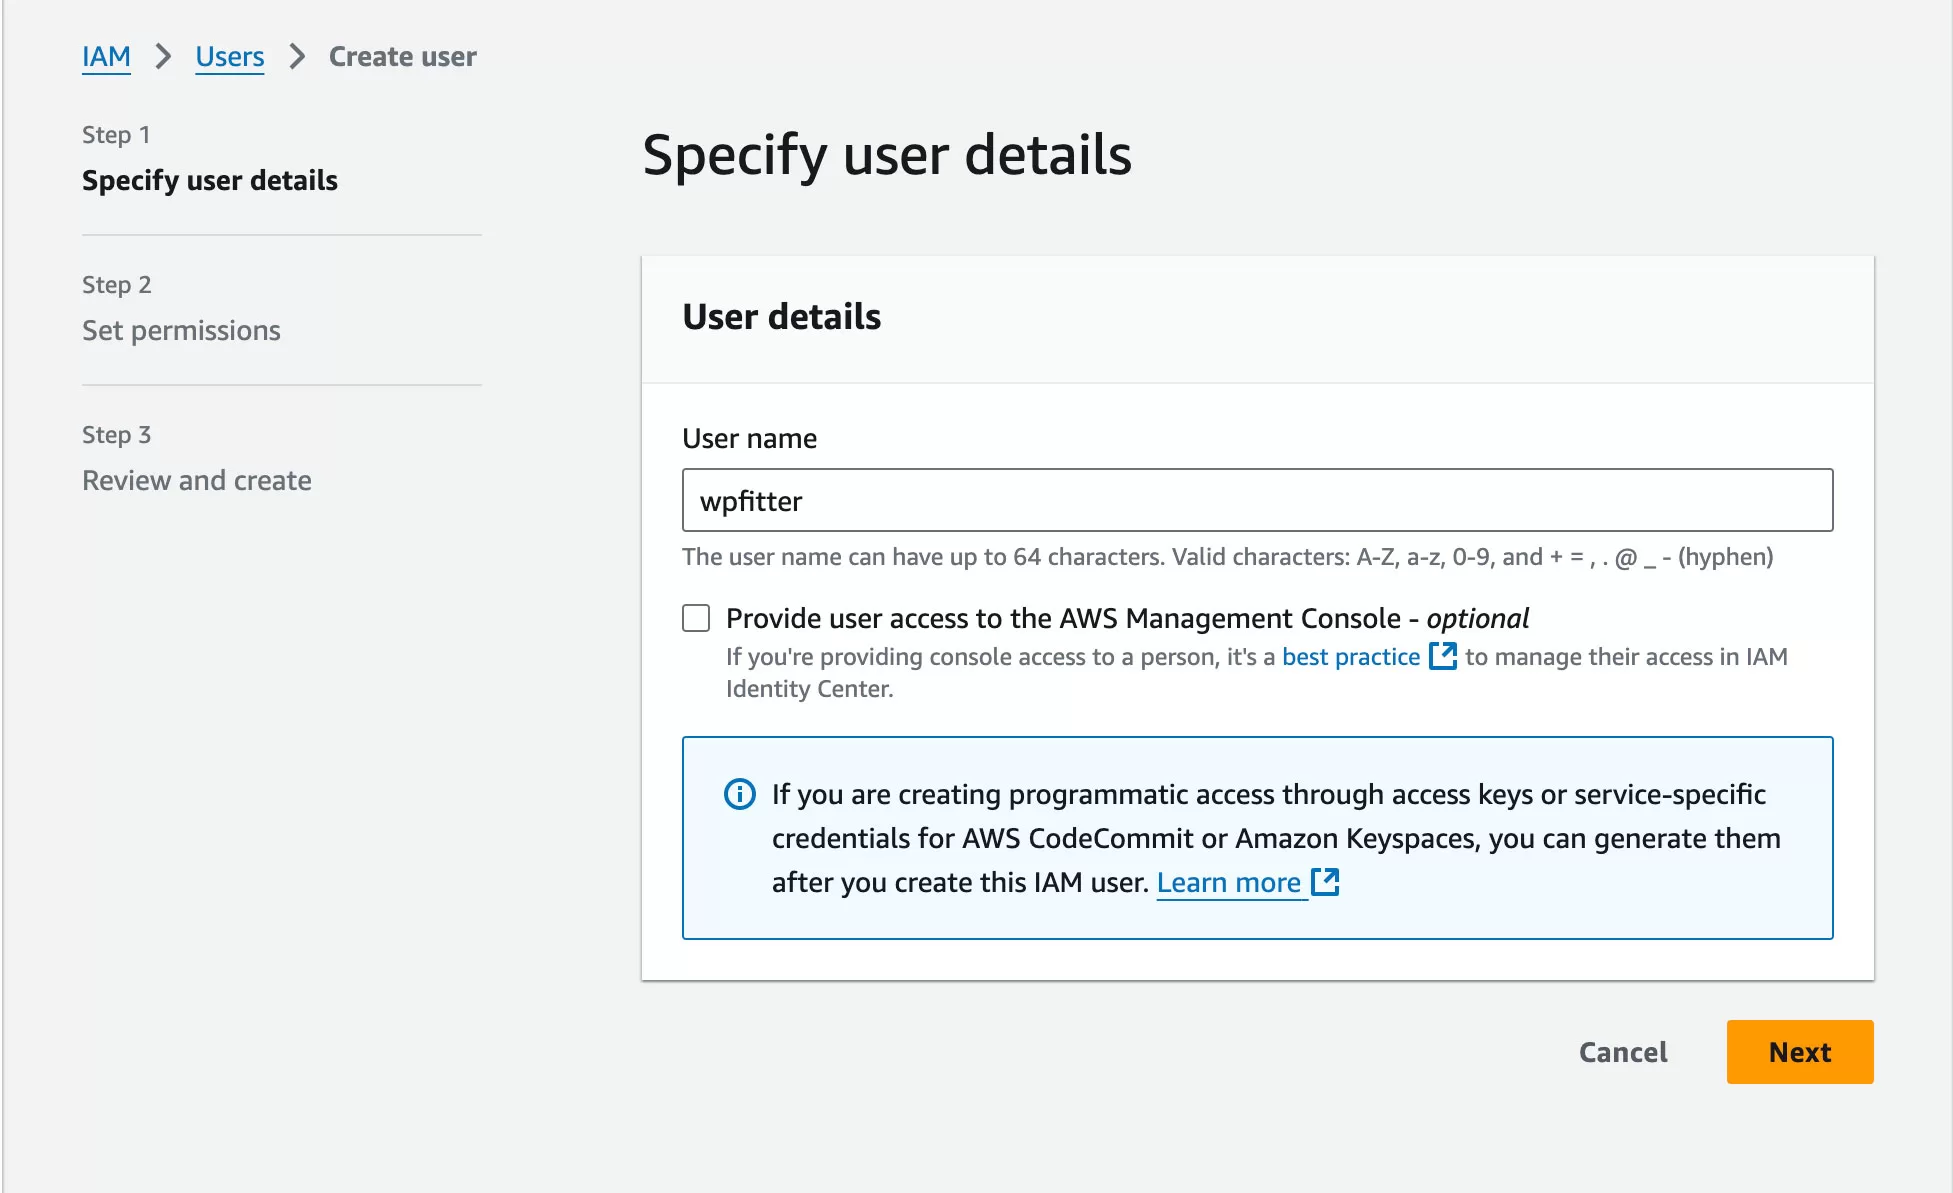
3. Leave the “Provide user access to the AWS Management Console” checkbox unchecked, then click Next to continue.
4. To grant the new user permission to manage buckets and objects in S3, click Attach policies directly. In the filter box, type s3full and select the AmazonS3FullAccess policy. Then, click Next at the bottom of the page.
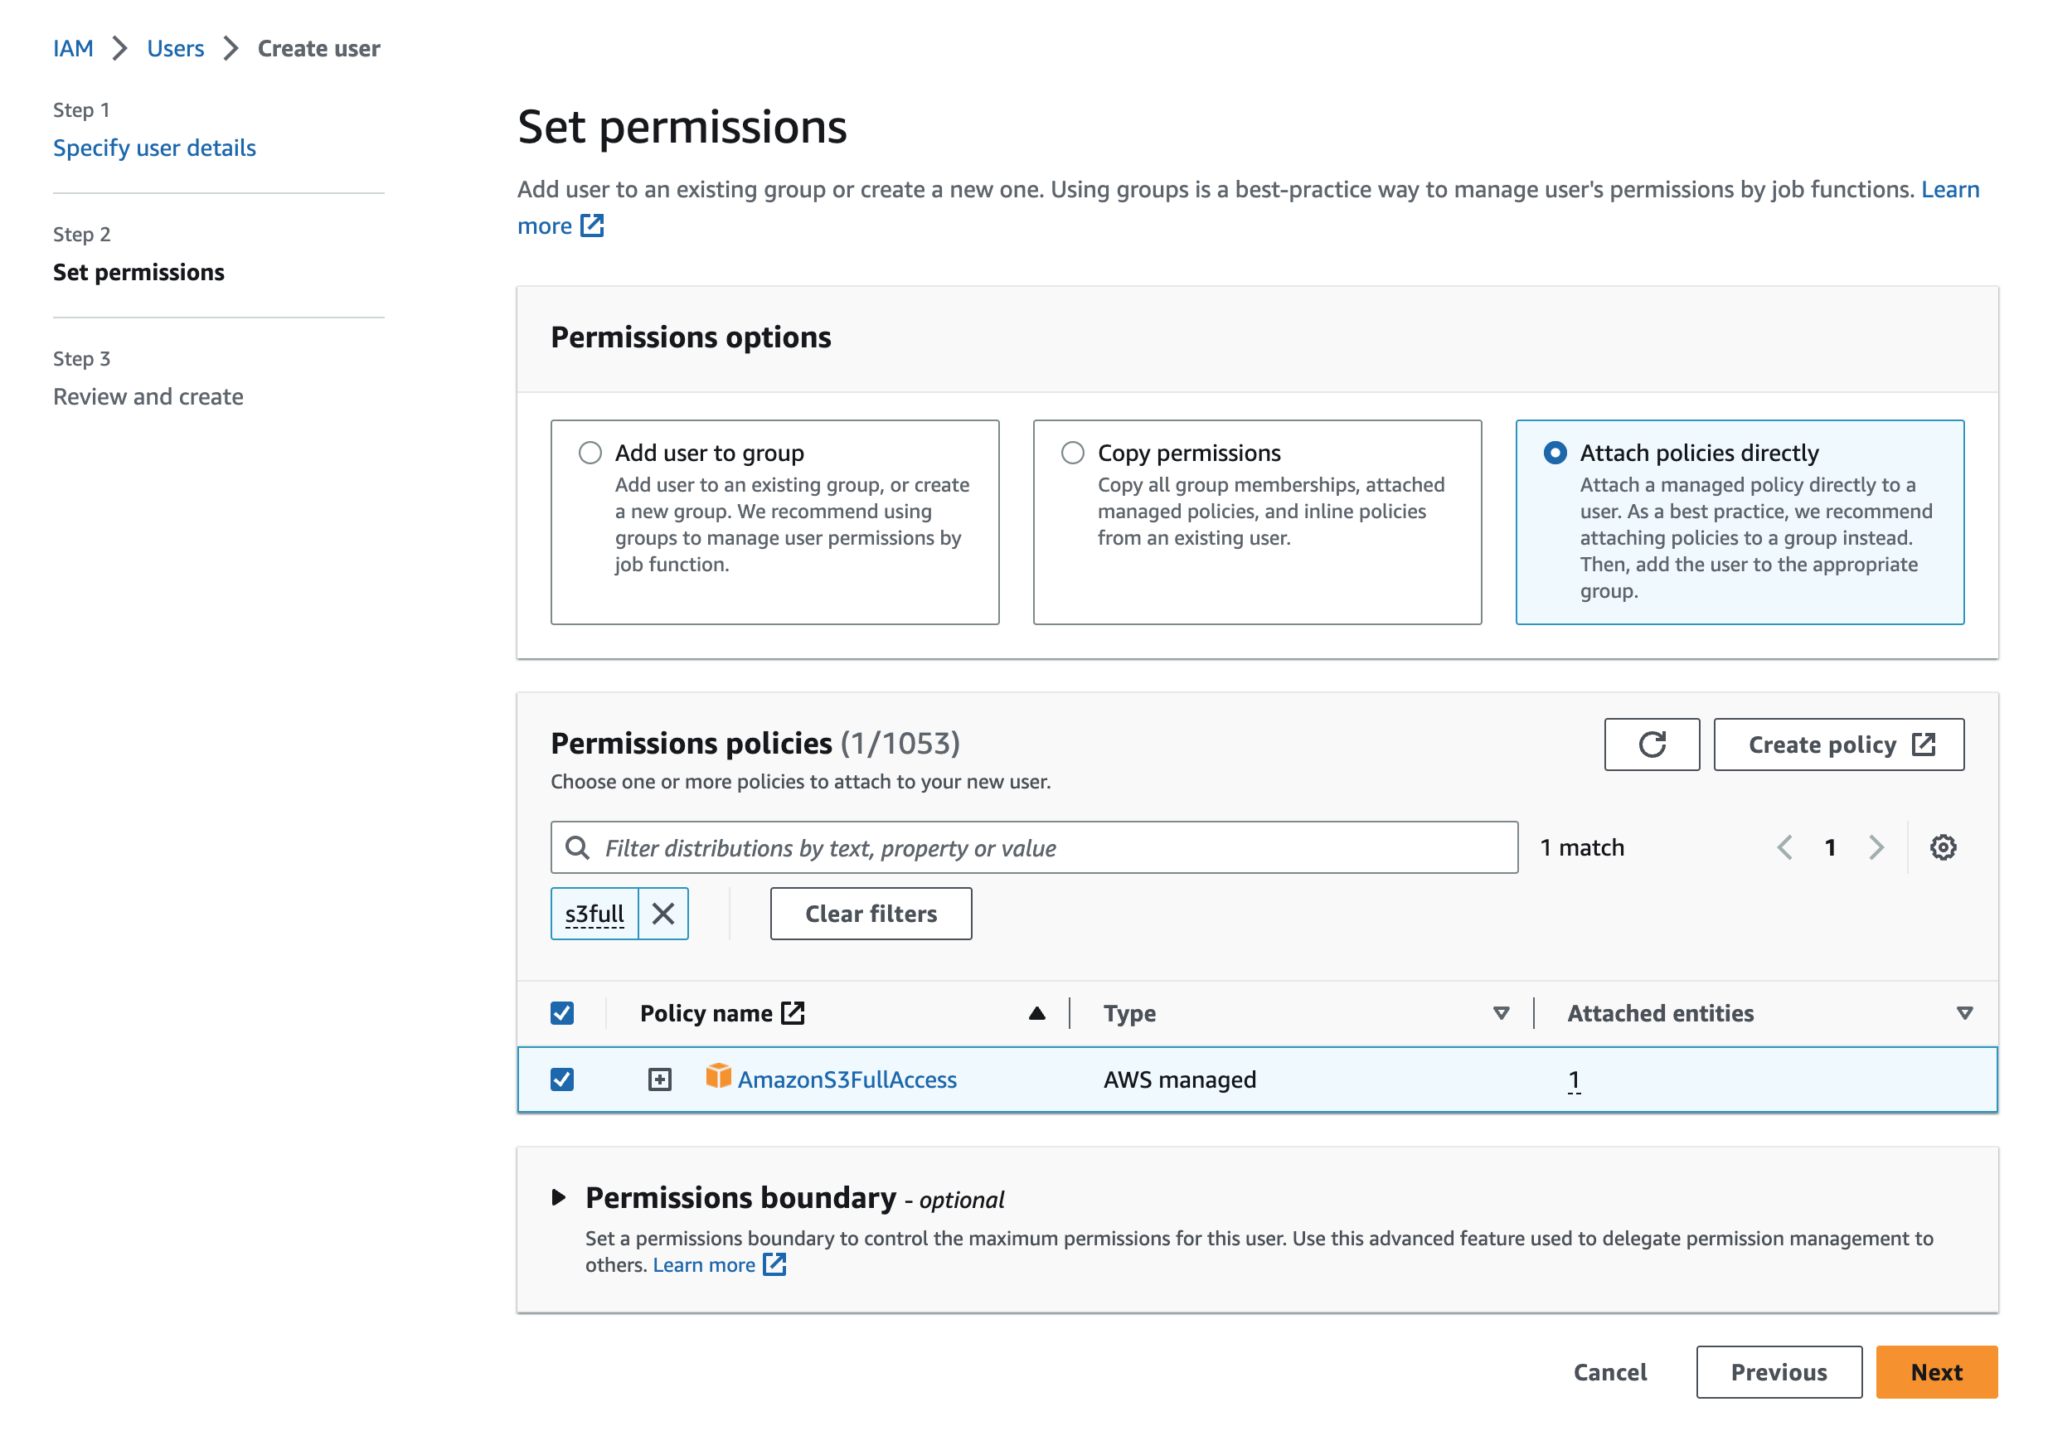
5. click the Create user
6. Click on the newly created user name in the IAM Users section of the AWS Console to open the user details page.
7. Go to the Security credentials tab, scroll down to the Access keys section, and click the Create access key button.

8. In the “Access key best practices & alternatives” section, select “Application running outside AWS”, then click Next.
9. The second step lets you set an optional description tag. Whether you choose to add tags or not, click Create access key to proceed to the final step.
10. You will be shown the user’s security credentials, including an Access Key and a Secret Access Key. Amazon will not display these credentials again, so be sure to save them securely. We will need them in the next steps to connect S3 to WordPress.
Step 4: Offloading WordPress Media Files to Amazon S3
The Advanced Media Offloader plugin simplifies media offloading to Amazon S3. It connects your WordPress media library to AWS S3, boosting performance by reducing server load.
For more details, visit the plugin’s official page or check it out on the WordPress Plugin Directory.
Install and Activate the Advanced Media Offloader Plugin
In your WordPress dashboard, go to Plugins > Add New Plugin. Search for Advanced Media Offloader, click Install Now, and activate the plugin once installed.
Alternatively, you can download the plugin from the WordPress Plugin Directory, then upload and install it manually via Plugins > Add New Plugin > Upload Plugin.
After activation, you’ll be ready to configure the plugin for Amazon S3.
Configure Advanced Media Offloader for Amazon S3
Once the Advanced Media Offloader plugin is activated, follow these steps to configure it:
- Add Amazon S3 credentials to wp-config.php using provided constants.
- Navigate to Media Offloader in WordPress dashboard sidebar.
- Test connection. If unsuccessful, review wp-config.php credentials.
- Configure plugin settings as desired.
- Save settings to complete setup.
Here’s an example of the constants that should be added to your wp-config.php file. Make sure to replace the placeholders with your actual Amazon S3 credentials:
define(ADVMO_AWS_KEY, 'your-aws-access-key');
define(ADVMO_AWS_SECRET, 'your-aws-secret-key');
define(ADVMO_AWS_BUCKET, 'your-aws-bucket-name');
define(ADVMO_AWS_DOMAIN, 'your-custom-domain');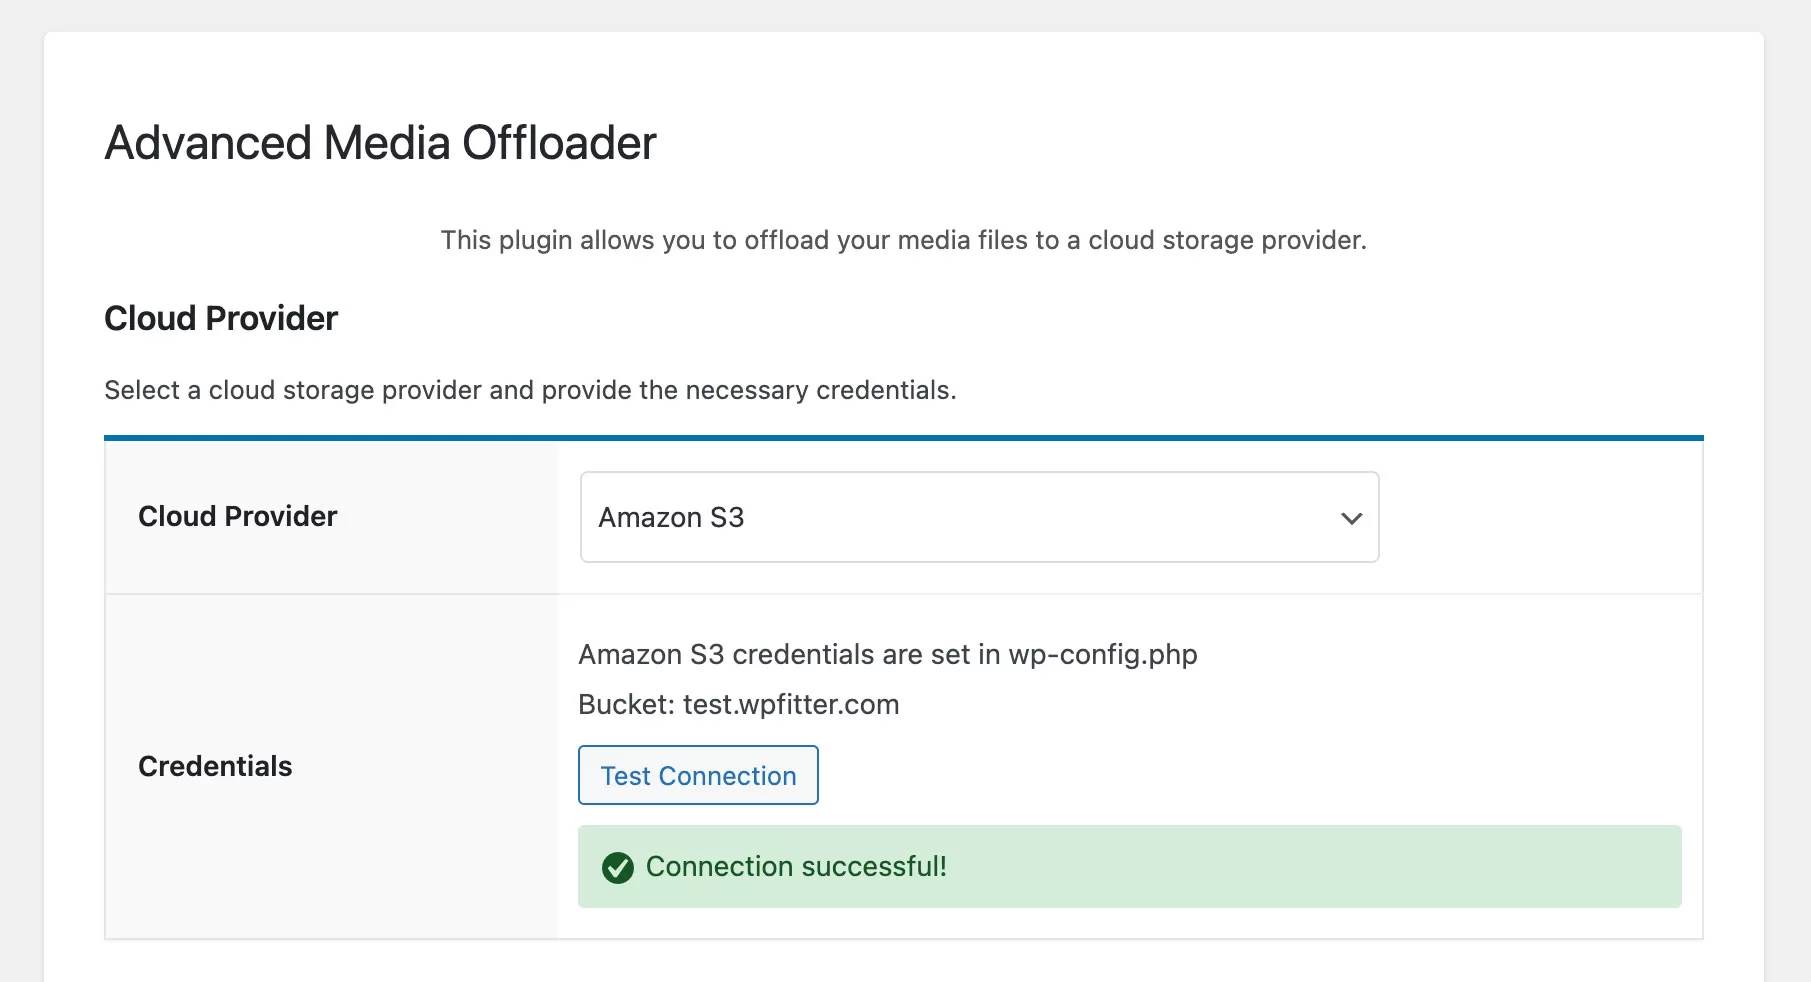
If you encounter any issues configuring the plugin, feel free to reach out in the comments section below or contact us directly through the Get in Touch page.
Conclusion
Offloading your WordPress media files to Amazon S3 using the Advanced Media Offloader plugin is a smart and efficient way to optimize your website’s performance and storage.
This solution not only helps reduce the load on your server but also ensures faster content delivery and improved scalability for your WordPress site. With your media files securely stored in the cloud, you can focus on creating great content while enjoying the benefits of a faster, more reliable website.
