Managing large media libraries can quickly slow down your WordPress site and increase your hosting costs. That’s where media offloading comes in. By moving your images, videos, and other uploads to cloud storage like Backblaze B2, you can dramatically improve performance and reduce server load — while keeping everything seamlessly accessible inside WordPress.
In this guide, we’ll show you exactly how to offload WordPress media files to Backblaze B2 using the Advanced Media Offloader plugin.
Why Offload Media to Backblaze B2?
Backblaze B2 is one of the most affordable and reliable cloud storage services on the market. It’s S3-compatible, meaning you can connect it to any WordPress plugin or app that supports Amazon S3.
Here’s why thousands of site owners prefer Backblaze B2 for media offloading:
- Lower costs — Up to 80% cheaper than AWS S3
- Faster performance — Global Content Delivery With Zero Egress Fees
- Secure & redundant — Built-in encryption and redundancy
- Scalable — Grow your storage without worrying about limits
What You’ll Need
Before you start, make sure you have:
- A Backblaze B2 account
- The Advanced Media Offloader plugin installed and activated on your WordPress site
- A B2 bucket created for your media files
Step 1: Create a Backblaze B2 Bucket
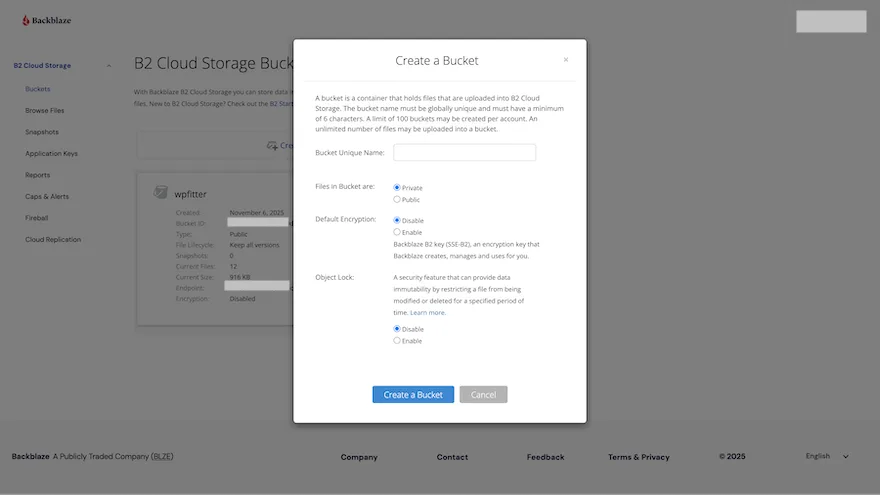
- Log in to your Backblaze B2 account.
- Go to Buckets → click Create a Bucket.
- Choose a unique bucket name (e.g.,
mywebsite-media). - Set Bucket Type to Public.
- Click Create a Bucket.
You’ll now have a new B2 bucket ready to receive your WordPress media files.
Tip: Make sure your email is verified and you have a payment method on file if you’re creating a public bucket.
Step 2: Generate Application Keys
To allow your WordPress site to communicate with Backblaze, you’ll need to create API keys.
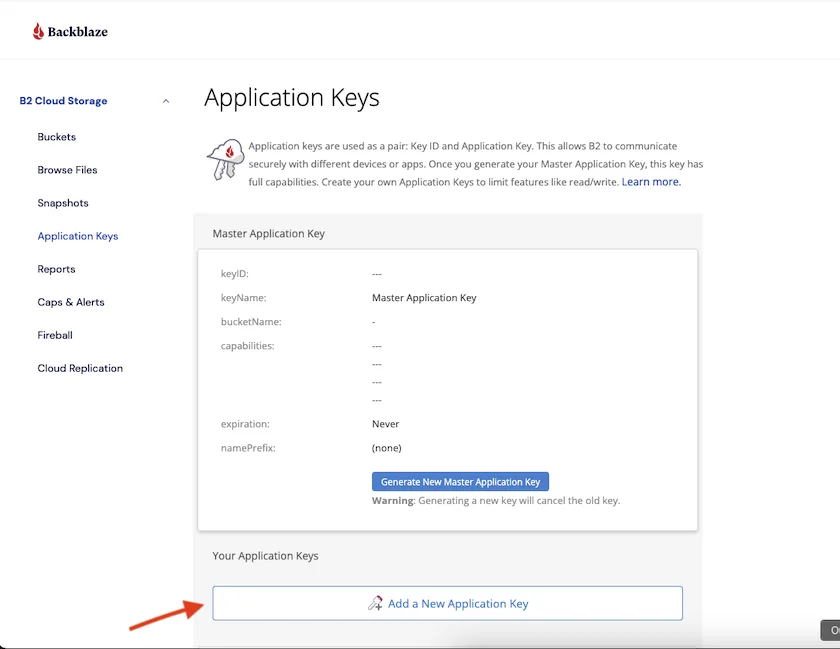
- In your Backblaze dashboard, go to Application Keys → Add a New Application Key.
- Name of Key: Give it a recognizable name (e.g., WordPress Offload Key).
- Allow access to Bucket(s): Select the bucket you created in Step 1.
- Type of Access: Read and Write — this allows WordPress to both upload and read files from your bucket.
- Leave File name prefix and Duration fields empty (the defaults are fine).
- Click Create New Key.
- Copy the Key ID and Application Key — you’ll need these in the next step.
Important: You can only view your Application Key once, right after creation. Make sure to store it securely (for example, in your password manager).
Step 3: Install and Activate Advanced Media Offloader
Before you can connect your site to Backblaze B2, you’ll need to install and activate the Advanced Media Offloader plugin on your WordPress website.
Here’s how to do it:
- Log in to your WordPress Admin Dashboard.
- Go to Plugins → Add New.
- In the search bar, type “Advanced Media Offloader.”
- Click Install Now, and once installed, click Activate.
- After activation, a new Media Offloader menu will appear in your WordPress dashboard sidebar.
Tip: If you’ve downloaded the plugin from the official website, you can also upload it manually by clicking Upload Plugin → Choose File → Install Now → Activate.
Once activated, you’re ready to connect WordPress to Backblaze B2 and start offloading your media library.
Step 4: Connect WordPress to Backblaze B2
Now that your Backblaze B2 bucket and application keys are ready, it’s time to connect your WordPress site to Backblaze B2 using Advanced Media Offloader.
Add Your Credentials to wp-config.php
- Open your WordPress site’s
wp-config.phpfile (located in the root directory of your WordPress installation). - Copy the following code snippet and paste it into the file — ideally above the line that says
/* That's all, stop editing! */ - Replace each placeholder with your actual Backblaze B2 details
define('ADVMO_BACKBLAZE_B2_KEY', 'your-application-key-id');
define('ADVMO_BACKBLAZE_B2_SECRET', 'your-application-key');
define('ADVMO_BACKBLAZE_B2_BUCKET', 'your-bucket-name');
define('ADVMO_BACKBLAZE_B2_REGION', 'your-bucket-region');
define('ADVMO_BACKBLAZE_B2_DOMAIN', 'your-domain-url');
define('ADVMO_BACKBLAZE_B2_ENDPOINT', 'your-endpoint-url');
Tip: Keep your keys private — never share your
wp-config.phpfile publicly or commit it to a public repository.
Notes for Domain and Endpoint Setup:
Custom Domain URL:
Use the following structure for your custom domain:
https://your-bucket-name.s3.your-region.backblazeb2.com/
For example, if your bucket name is wpfitter and your region is eu-central-003, your domain URL will be:
https://wpfitter.s3.eu-central-003.backblazeb2.com/
Endpoint URL:
Use the following structure for the endpoint:
https://s3.your-region.backblazeb2.com
Example:
https://s3.eu-central-003.backblazeb2.com
Connect from the WordPress Dashboard
- Go to WordPress Dashboard → Media Offloader → General Settings.
- Select Backblaze B2 as your Cloud Provider.
- Click Test Connection to confirm that your site can successfully communicate with Backblaze.
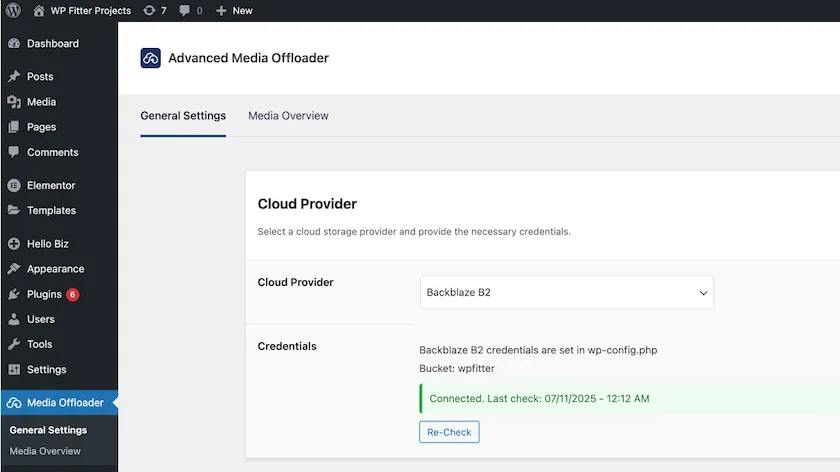
If the test passes, your connection is active — WordPress is now linked to your Backblaze B2 bucket and ready to start offloading media files.
Step 5: Start Offloading Your Media Files
Once the connection test is successful, the plugin will automatically offload any newly uploaded media files from your WordPress Media Library directly to your Backblaze B2 bucket.
That means every new image, video, or file you add to WordPress will be securely stored in the cloud — helping you save local server space and speed up your site.
If you’d like to offload your existing media files as well, we recommend using the WP-CLI method for faster and more reliable bulk processing.
Follow this step-by-step guide here:
How to Bulk Offload Media with WP-CLI (Advanced Media Offloader)
Bonus: Use a Custom Domain for Your Backblaze B2 Media URLs
By default, your media files stored in Backblaze B2 are served from a long bucket URL like:
https://wpfitter.s3.eu-central-003.backblazeb2.com/
To make your URLs look more professional and on-brand, you can point your own custom domain (e.g., media.yourdomain.com) to your Backblaze bucket using a CNAME record.
Here’s how to do it:
- Go to your domain’s DNS settings (from your domain registrar or DNS provider).
- Add a new CNAME record with the following details:
- Type: CNAME
- Name / Host:
media(or any subdomain you prefer) - Value / Target: your Backblaze bucket domain URL, e.g.
wpfitter.s3.eu-central-003.backblazeb2.com
- Save your DNS changes.
- Wait for the DNS to propagate (usually within a few minutes to a few hours).
- Once active, you can use your custom domain in WordPress by setting it as the Backblaze Domain URL in your
wp-config.php:
define('ADVMO_BACKBLAZE_B2_DOMAIN', 'https://media.yourdomain.com/');
💡 Tip: Using a custom domain not only looks cleaner but also makes it easier to switch storage providers in the future without breaking your existing media URLs.
Final Thoughts
Offloading your WordPress media to Backblaze B2 is one of the simplest and most cost-effective ways to improve your site’s performance, scalability, and reliability.
With Advanced Media Offloader, you can set it up in minutes — no coding, no complex configurations.
Start offloading your media today and experience faster load times, reduced server costs, and a smoother content workflow.
Download Advanced Media Offloader and connect your site to Backblaze B2 in just a few clicks!
